by Kesaa Interiors | Seasonal & Holiday Decor
This post is all about Christmas Room Decor DIY.
Designing a room for the holidays should feel just as personal as selecting the gifts under the tree. The beauty of the season lies in the details that feel thoughtful, handcrafted, and tailored to your home’s personality. While store-bought decorations have their place, Christmas room decor DIY projects allow you to layer in character and artistry that reflect your own sense of style.
As a designer, I find that handmade elements bring a depth and warmth to interiors that mass-produced pieces often lack. They soften a space, make it feel more lived-in, and encourage connection – guests can immediately sense the care behind them.
In this post, you’ll find ideas that balance creativity with a professional designer’s eye, creating a holiday atmosphere that feels curated but still approachable.
Why Choose DIY for Christmas Room Decor?
Choosing DIY over entirely pre-packaged décor isn’t just about saving money – it’s about creating an environment that feels authentic and layered. When you incorporate Christmas room decor DIY projects into your home, you’re not just adorning a space with festive details. You’re shaping the room’s atmosphere with a blend of tradition, creativity, and personal expression.
Personality and Warmth
Handmade decorations immediately stand out. Even the simplest DIY garland or ornament adds charm that can’t be replicated by store-bought items. These crafted touches draw the eye and invite conversation.
Design Flexibility
From minimalist Scandinavian-inspired pieces to bold, vibrant colour schemes, Christmas room decor DIY gives you the freedom to align every detail with your chosen design direction. This flexibility ensures your space feels cohesive, not cluttered, as everything ties back to your broader holiday theme.
Budget-Friendly Without Sacrificing Style
DIY doesn’t mean compromising on quality or elegance. With deliberate choices in materials, your projects can easily rival professional decorative pieces. The secret is in selecting textures and finishes that complement your existing space—linen, natural wood, metallic accents, or greenery.

Setting the Foundation – Themes & Colour Palettes
Before diving into individual projects, it’s important to step back and establish a clear foundation for your holiday design. A theme and colour palette act as the guiding structure for all your Christmas room decor DIY ideas. Without them, the risk is a room that feels more haphazard than harmonious. By taking a few minutes to define your approach, you set the stage for a cohesive and visually compelling space.
Choosing a Cohesive Palette
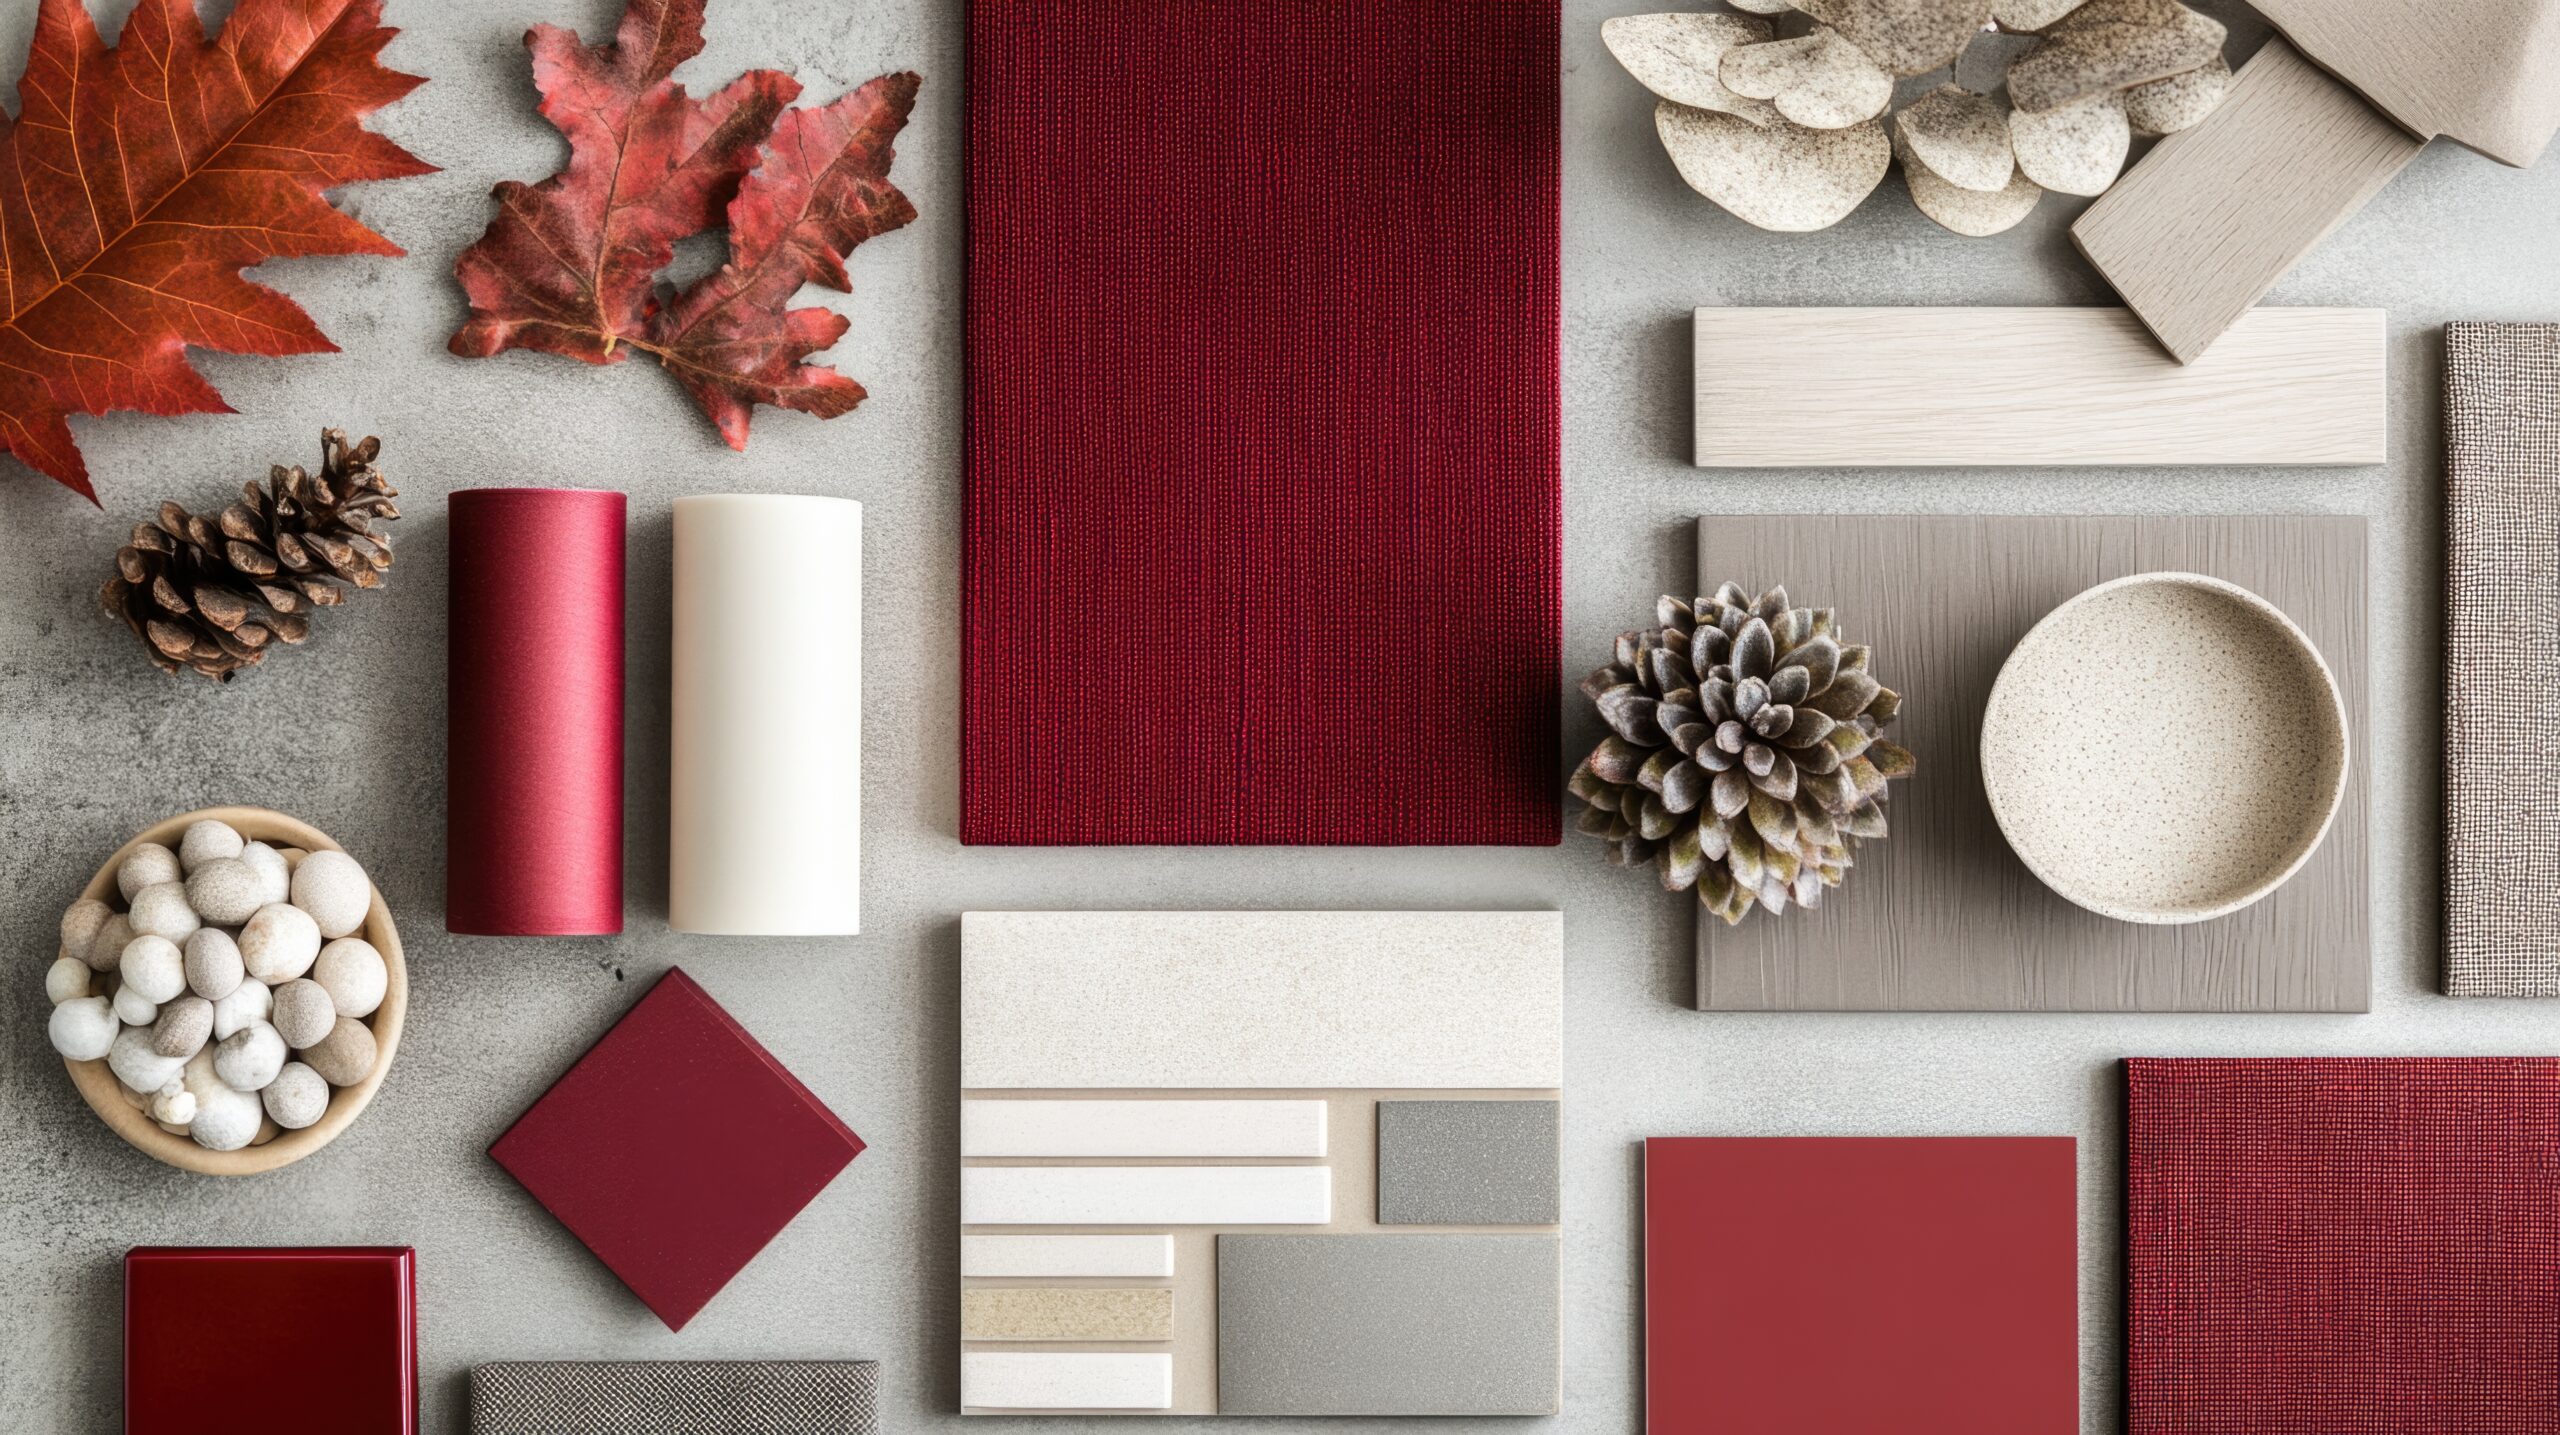
Think of your palette as the invisible thread tying the room together. Traditional combinations like red and green remain timeless, but there are many sophisticated alternatives – crisp whites with silver accents, warm neutrals paired with greenery, or jewel tones layered with touches of brass. When you anchor your DIY projects in a consistent palette, even the smallest handmade details feel intentional.
Aligning with Your Style
Your DIY decorations should enhance the style of your home rather than compete with it. For example, a minimalist space might benefit from paper stars in neutral tones, while a rustic interior could shine with handcrafted wood ornaments and textured garlands. By tailoring your Christmas room decor DIY to your existing style, you create harmony rather than visual noise.
Balancing Colour and Material
As you mix and match colours, don’t overlook the role of materials. Fabrics, woods, glass, and natural elements add texture and depth that pure colour alone can’t achieve. Combining soft textiles with reflective metallic accents ensures your DIY pieces don’t just look beautiful but also feel rich and layered – exactly the kind of detail professional design focuses on.
DIY Christmas Tree Alternatives & Enhancements
The Christmas tree is often the centrepiece of a holiday room, but it doesn’t always need to be a traditional evergreen to feel festive. Incorporating Christmas room decor DIY projects into your tree design – or even creating an inventive alternative – can make this focal point feel personal, stylish, and unexpected.
Handmade Ornaments
Store-bought ornaments can be beautiful, but there’s something undeniably special about ones you’ve crafted yourself. Try folded paper stars, clay baubles, or fabric ornaments made from leftover textiles. These handmade additions not only highlight your creativity but also help the tree feel distinct in your space. The key is consistency – repeat colours and materials from your chosen palette so the tree feels thoughtfully styled rather than pieced together.
Custom Tree Toppers
Skip the mass-produced star or angel and create a topper that reflects your theme. For a minimalist design, a geometric paper star works beautifully; for a nature-inspired look, woven branches or dried florals arranged in a sculptural form can be striking. Crafting your own topper ensures the tree feels one-of-a-kind and aligned with the rest of your décor.
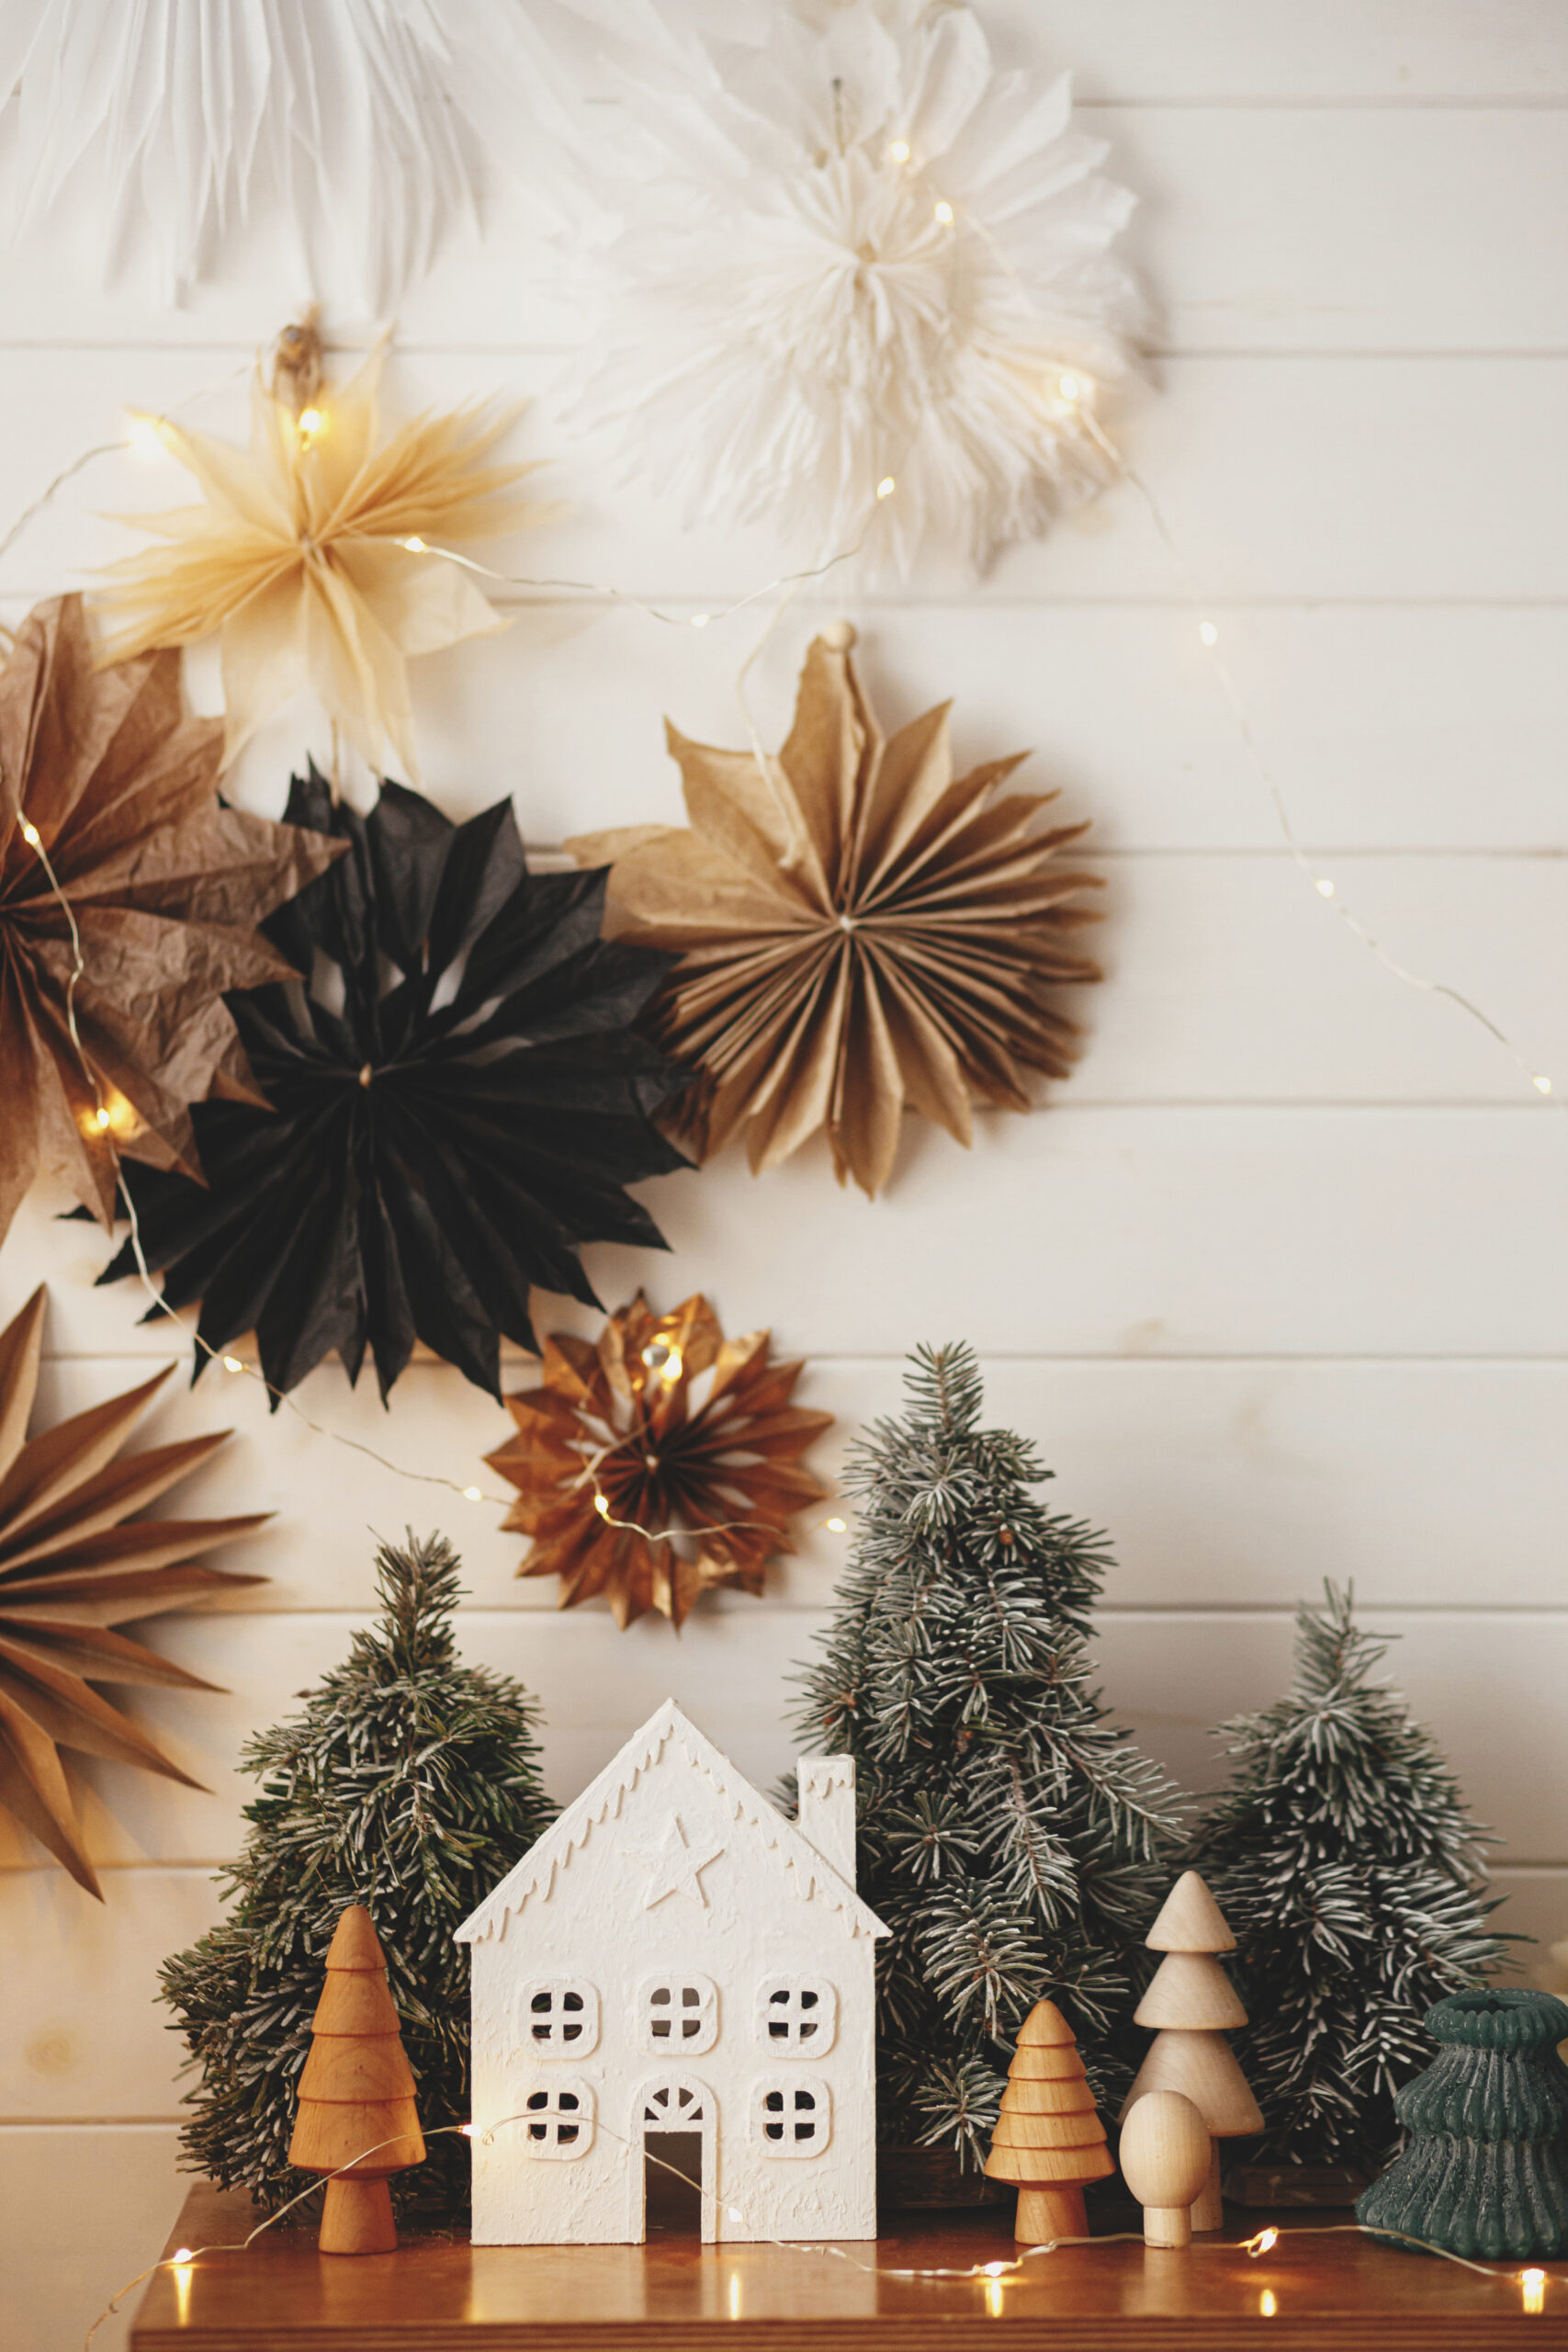
Tabletop & Alternative Trees
Not every home has room for a full-sized Christmas tree, and that’s where alternatives shine. A small tabletop tree decorated with handcrafted ornaments can look just as impactful. For a more modern take, arrange branches in a vase and decorate them with delicate DIY ornaments or lights. These scaled-down versions are perfect for dining areas, bedrooms, or entryways, allowing you to extend your Christmas room decor DIY beyond the living room.
Designer’s Tip
When planning tree enhancements, think about balance and proportion. Pair delicate, handmade details with a few larger-scale ornaments to create visual structure, and layer textures to avoid flatness. This attention to scale ensures your DIY decorations elevate the overall design rather than feeling like afterthoughts.

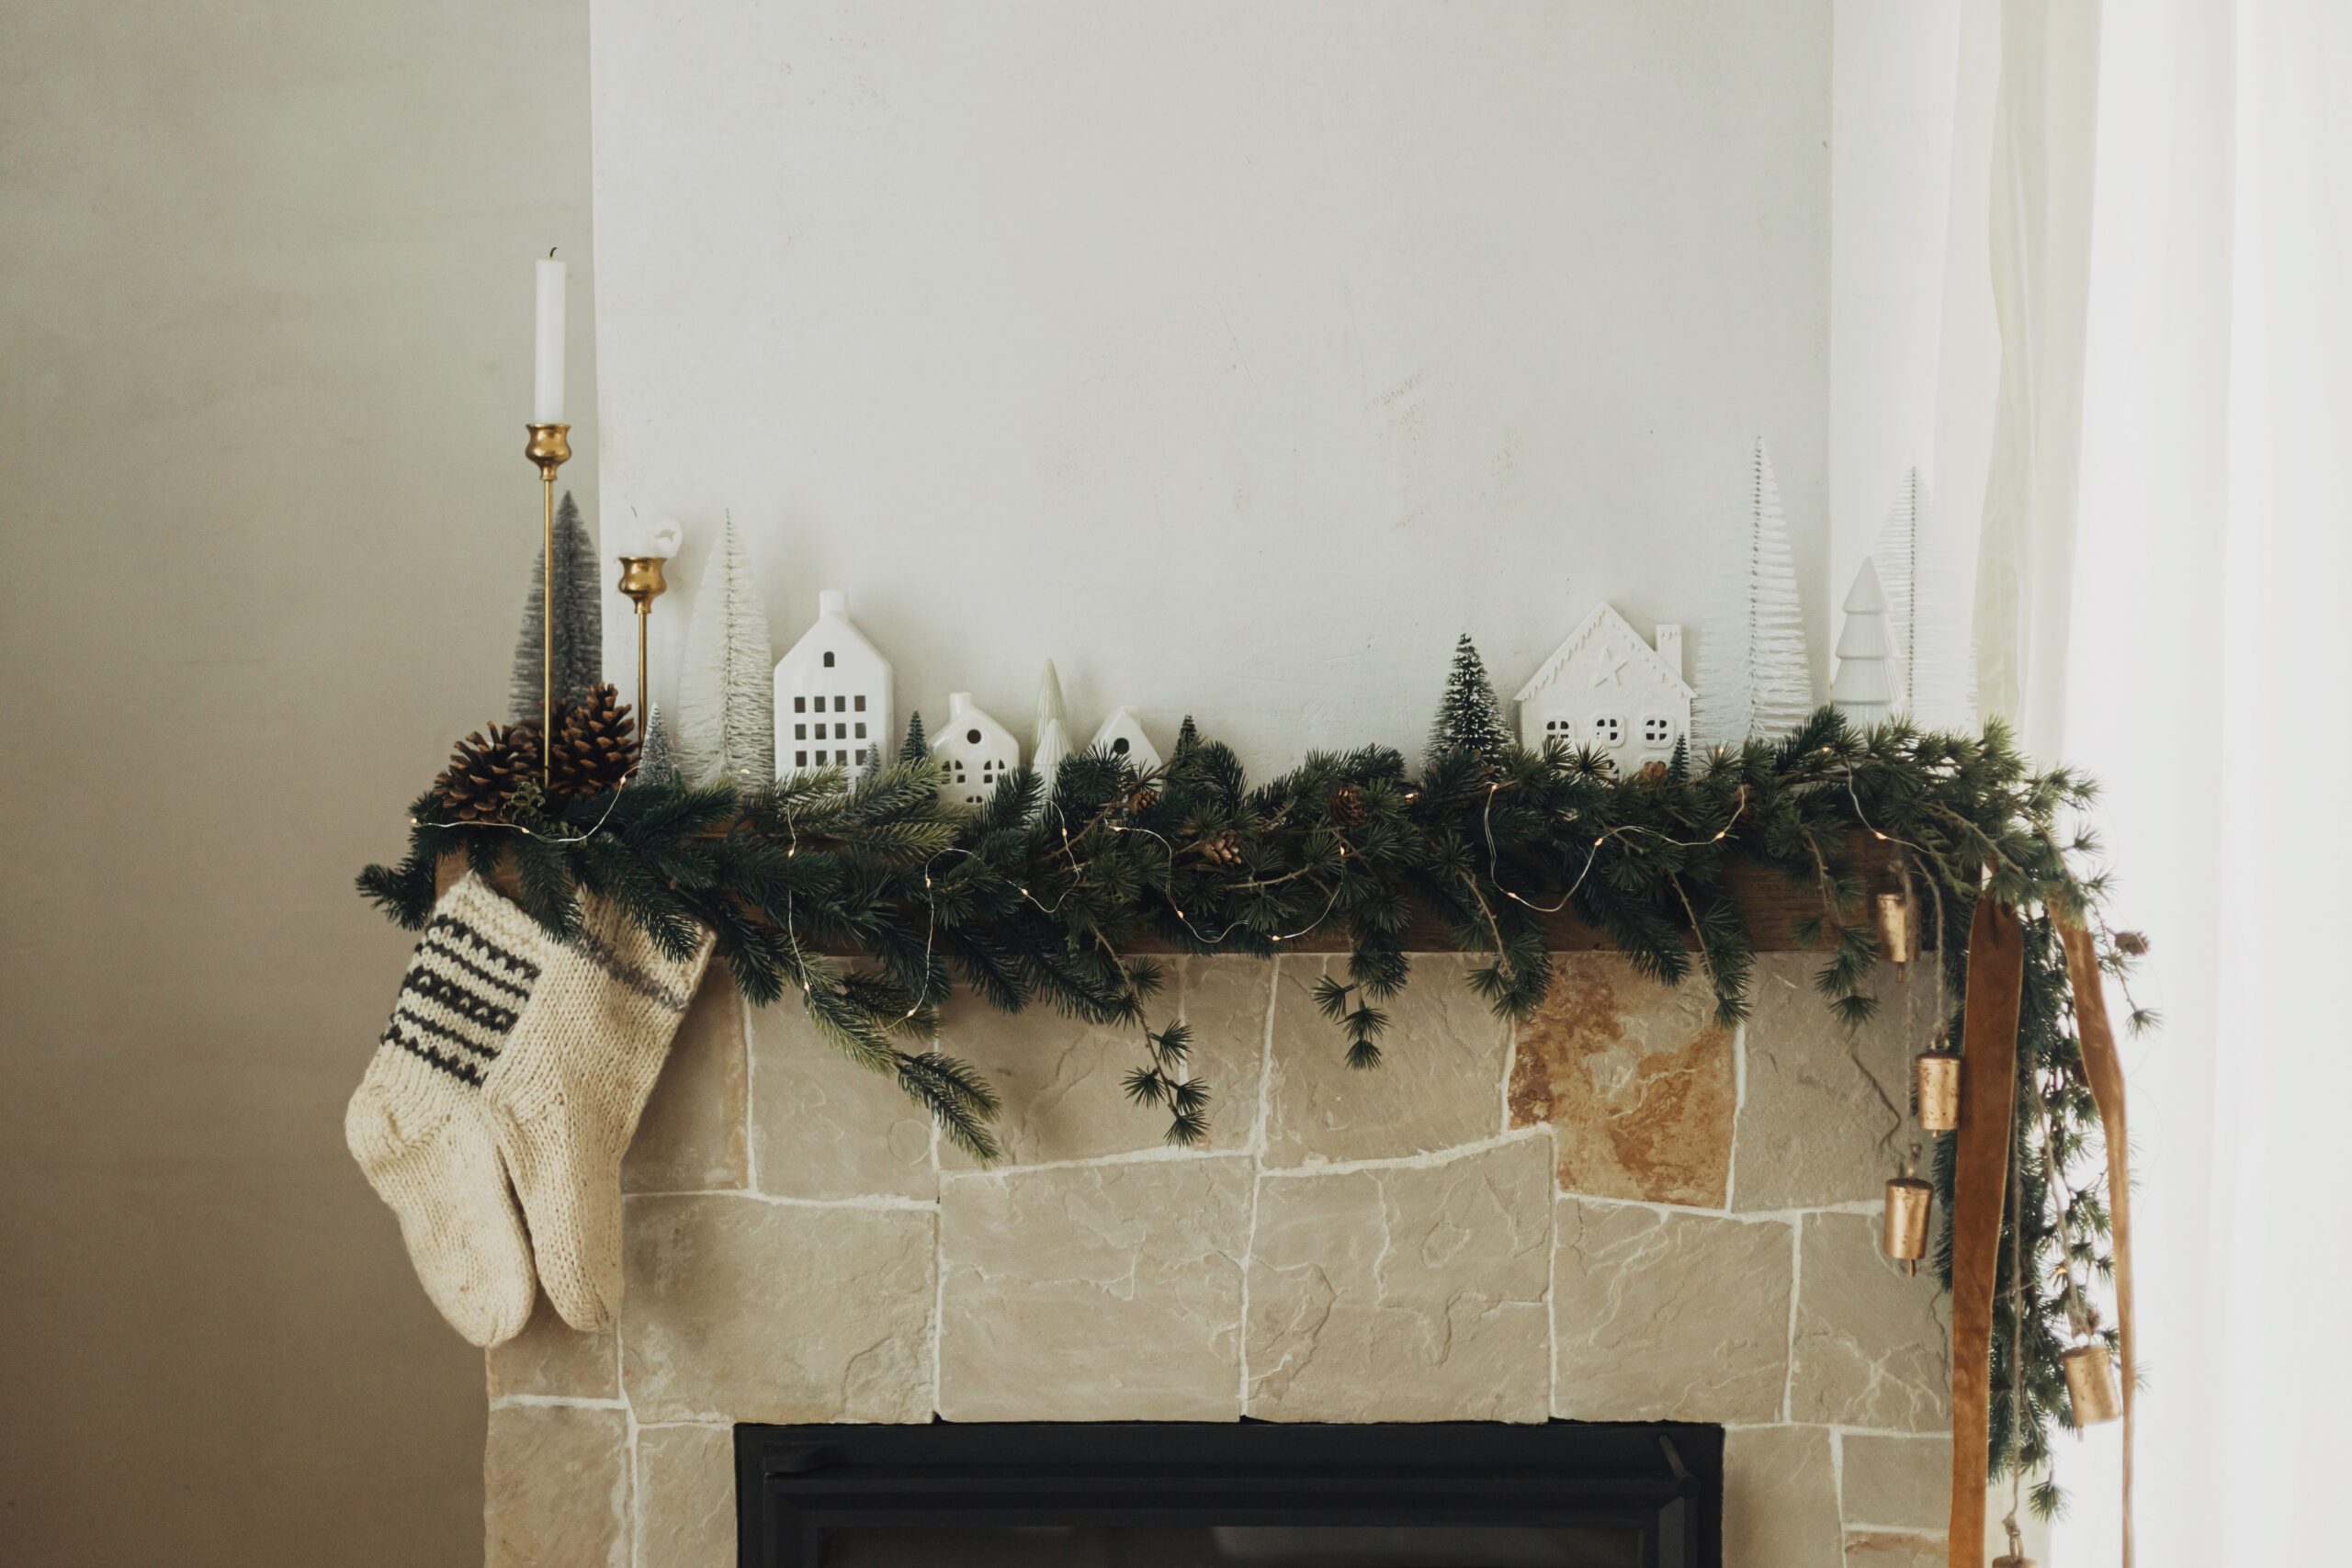
Handmade Garlands & Wall Accents
While the Christmas tree naturally draws attention, don’t underestimate the impact of walls, mantels, and doorways. These vertical spaces allow you to extend your holiday theme throughout the room, and incorporating Christmas room decor DIY projects into these areas can completely transform the atmosphere. Garlands, wreaths, and wall art not only frame the room but also guide the eye, adding layers of texture and detail without overwhelming the space.
DIY Garlands
Handmade garlands are a versatile way to connect different parts of a room. Dried orange slices strung together create a warm, vintage look, while paper chains or folded paper stars lean more minimalist and modern. For a rustic design, combine twigs, pinecones, and sprigs of greenery for a natural garland that feels organic yet refined. Whichever direction you choose, keep proportions in mind – longer garlands look best across mantels or doorways, while smaller, more delicate versions suit shelving or windows.
Wreath Alternatives
Traditional wreaths are always timeless, but with a DIY approach, you can customise them to better align with your palette and style. A wreath made from eucalyptus leaves feels fresh and modern, while a fabric-wrapped frame adds softness and texture. Even a hoop wrapped in ribbon can become a striking, minimalist centrepiece for the wall. These handmade accents bring continuity to your holiday décor when they echo colours or motifs from other projects in the room.
Wall Art & Banner Ideas
For an extra layer of creativity, consider simple wall accents like fabric or paper banners with seasonal phrases, or a framed collection of cut-out snowflakes. These lightweight projects work especially well in smaller rooms where you may not have space for larger decorative elements. They’re effective in tying corners of the room together while still keeping the visual flow cohesive.
Designer’s Tip
When adding DIY wall décor, be selective. Too many handmade pieces on one wall can begin to feel cluttered. Aim for one strong focal point and allow negative space around it. This ensures your Christmas room decor DIY choices look curated rather than crowded.
Cosy Corners – DIY Décor Beyond the Tree
Not every festive element needs to revolve around the Christmas tree. Some of the most inviting, memorable holiday moments are created in the quieter corners of a room – reading nooks, side tables, or even the entryway. Extending your Christmas room decor DIY projects into these spaces ensures your holiday atmosphere feels complete and immersive, rather than concentrated in just one focal point.
Textile Touches
A simple way to warm up corners is with DIY textiles. Handmade pillow covers in seasonal fabrics, woven or knitted throws, or even slipcovers for dining chairs instantly bring a sense of cosiness. By coordinating your textiles with your chosen palette, these smaller handmade accents reinforce the room’s overall design direction without overpowering it.
DIY Candle Holders & Lanterns
Candles are an essential part of holiday ambience, and they become even more special in handcrafted holders. Mason jars painted in muted tones, wooden blocks drilled for votives, or clay tealight holders add texture and glow to small nooks. Group them in threes or fives for a layered, professional look that feels intentional.
Handmade Tabletop Accents
Side tables and consoles are perfect platforms for smaller Christmas room decor DIY pieces. Consider homemade centrepieces such as a cluster of pinecones sprayed with metallic paint, simple greenery arrangements in upcycled jars, or personalised place cards for the dining area. These crafted accents create moments of discovery throughout the room, making the space feel layered and engaging.
Designer’s Tip
Think of these corners as supporting characters to your main décor statement. They shouldn’t compete with your tree or garland but instead add subtle layers of detail. Low lighting, soft textures, and uncomplicated DIY elements work best here because they create a mood without distracting from the room’s central focus.
Sustainable Christmas Room Decor DIY Ideas
Holiday decorating doesn’t have to mean purchasing new materials every season. Some of the most elegant and meaningful designs come from reimagining what you already have. Sustainability is not only practical but also inherently creative; it pushes you to think beyond the obvious. Integrating eco-conscious choices into your Christmas room decor DIY plan allows you to celebrate while staying mindful of waste and overconsumption.
Repurposed Materials
Look around your home before shopping for supplies. Glass jars can be turned into candle holders or miniature terrariums with sprigs of greenery. Leftover fabric can be sewn into ornament covers or ribbon alternatives. Even scraps of paper, when folded into stars or snowflakes, carry a timeless charm. The key is consistency: repeat these elements throughout the room so they feel integrated, not mismatched.
Nature-Inspired Elements
Nature offers endless inspiration for sustainable décor. Pinecones, evergreen branches, twigs, and dried citrus slices are not only biodegradable but also rich in texture and colour. A bowl of pinecones sprayed with a soft metallic or matte white paint makes a simple yet striking centrepiece. Branches arranged in a minimal vase can serve as a seasonal focal point for an entryway or tabletop. These pieces connect your home to the season organically.
Eco-Friendly DIY Tree Options
For an environmentally conscious alternative to a traditional tree, consider a branch wall hanging or a minimalist wooden frame decorated with handmade ornaments. Both require few resources but make a significant visual impact. They also provide a framework for smaller Christmas room decor DIY projects, making it easy to update year after year without heavy environmental cost.
Designer’s Tip
When working with natural or repurposed materials, editing is key. Too many raw textures in one space can feel mismatched, but when combined carefully, they create a sophisticated look. Balance rough with refined – pair a rustic pinecone garland with polished metallic candleholders, for example. This contrast elevates eco-friendly choices into a polished holiday statement.
Professional Designer Tips for Polished DIY Results
DIY projects shine when they’re done with intention. Even the simplest ideas can look elevated when applied with a designer’s mindset. By considering balance, scale, and finishing touches, your Christmas room decor DIY pieces will feel connected to your interior design rather than appearing as isolated crafts.
Balance and Scale
Think about proportions the same way you might when arranging furniture or artwork. Larger handmade pieces, like a wreath or centrepiece, should be balanced with smaller supporting décor so the room feels visually steady. For example, pair a bold DIY garland across the mantel with subtler details like handmade candleholders or ornaments placed nearby. This layering approach ensures the room flows naturally from one focal point to another.
Consistency in Materials and Colours
A room feels refined when your materials and palette are consistent. If you’ve chosen metallic accents, repeat them in several places – perhaps in painted pinecones, ornament hangers, and candle trays. When textures and finishes appear more than once, even across simple projects, it creates visual harmony and strengthens your overall design direction.
Lighting as a Finishing Touch
The glow of holiday lighting enhances everything around it. Strategically placing fairy lights, candles, or lanterns can highlight your handmade elements and create depth. For example, positioning lights behind a garland will accentuate its texture, while a cluster of candles can make DIY décor on a side table feel more atmospheric. Without light, details can fade into the background; with it, they take on sculptural quality.
Designer’s Tip
When in doubt, step back and evaluate the room as a whole. Your Christmas room decor DIY projects should enhance – not overwhelm – the space. A well-edited arrangement of handmade details feels far more polished than trying to display every idea all at once. Let intentionality guide your choices, and your room will reflect both creativity and design sophistication.

Holiday decorating is about more than just filling a room with seasonal objects – it’s about creating an environment that feels layered, personal, and inviting. By weaving Christmas room decor DIY projects into your design, you craft a space that reflects your style while also celebrating the traditions and spirit of the season. From handcrafted ornaments to sustainable accents and cosy corners, these thoughtful details bring depth and meaning to your home in a way store-bought décor simply can’t.

by Kesaa Interiors | Seasonal & Holiday Decor
This post is all about how to arrange living room furniture with tv and fireplace. I have always enjoyed helping people figure out how to arrange living room furniture with TV and a fireplace, because it is one of those design challenges that almost every home...
Rustic minimalist interior design is one of those styles that feels immediately grounding. I’ve always been drawn to interiors that feel calm, warm, and intentional, and this approach delivers exactly that without feeling overdesigned or sterile. It strips a space...
I have always been drawn to how modern dining room drapes can completely shift the look and feel of a space, often more than people expect from something as simple as window treatments. In this post, I am sharing practical and design‑focused ideas to help...
This post is all about Dark Dining Room Ideas. There’s something undeniably captivating about a dark dining room. The depth, the mood, the quiet confidence, it all creates a sense of intimacy that lighter spaces sometimes struggle to achieve. Designing with darker...
This post is all about Bathroom Vanity Organiser Under Sink. A bathroom vanity organiser under the sink can make an incredible difference in how your bathroom looks and functions. It’s often one of the most overlooked spaces in the home, yet it has the...
This post is all about Modern Minimalist Interior Design Living Room. A modern minimalist interior design living room is more than just a trend; it’s a reflection of how we live today. Clean lines, open spaces, and thoughtful details come together to create...
This Post Is All About Bedroom Ideas For Girls Designing a space that feels personal and full of character starts here, and these bedroom ideas for girls are the perfect inspiration. Whether you’re refreshing a cosy nook or planning a complete makeover, finding the...
Put in your email and sign up for weekly emails updating you on everything happening in the design world
by Kesaa Interiors | Seasonal & Holiday Decor, STYLES & TRENDS
This post is all about Fall Decor Inspiration.
Every year, when September rolls around, I find myself drawn to richer textures and warmer tones in my design work. It’s that distinct shift in natural light—softer, more golden—that signals it’s time to help homes transition into their cosiest season. As an interior designer, I’ve learned that great fall decor inspiration comes from understanding how to layer warmth into spaces that already function well.
The beauty of autumn decorating lies in its ability to make any room feel more inviting without requiring a complete overhaul. Whether you’re working with a modern minimalist space or a traditional home full of character, the right seasonal touches can transform a room’s feel. In this guide, I’ll share the fundamental principles I use when creating fall atmospheres, room-specific strategies that actually work, and practical tips for achieving that perfectly balanced autumn look—all without breaking your budget or cluttering your space.

Essential Elements of Fall Decor: A Designer’s Foundation
Before diving into specific rooms or trendy ideas, let’s establish the core elements that make fall decorating work. These fundamentals will guide every decision you make, ensuring your fall decor inspiration translates into cohesive, livable spaces.
The Fall Colour Palette
The right colour palette forms the backbone of any seasonal design. For fall, I build around three categories that work harmoniously together:
Warm Neutrals serve as your foundation—think creamy whites, soft beiges, warm greys, and rich taupe tones. These colours ground your space and prevent it from feeling too themed or temporary. They’re particularly important if you have existing furniture or architectural elements you’re working around.
Rich Jewel Tones bring in that quintessential autumn depth. Burgundy throw pillows, burnt orange accents, deep gold accessories, and forest green elements add layers of sophistication. The key is choosing one or two of these stronger colours as accents rather than overwhelming the space with all of them.
Natural Wood Tones and Metallic Accents provide the finishing touches. Warm woods like walnut and oak naturally complement fall palettes, while brass, copper, and aged bronze metallics add subtle glamour that catches autumn’s golden light beautifully.

Textures That Define Autumn
Texture is where fall decor inspiration really comes to life. The goal is to create visual and tactile warmth through strategic layering:
Chunky Knits and Cable Patterns immediately signal cosiness. A substantial cable-knit throw draped over a sofa arm or chunky knit pillows nestled in chairs transform seating areas into inviting retreats. Look for pieces with interesting stitch patterns that add visual depth.
Velvet and Corduroy Fabrics bring luxurious warmth to any space. These materials work particularly well on accent pillows, ottoman covers, or even as table runners. The way they catch and reflect light adds dimension that flat fabrics simply can’t achieve.
Natural Materials ground your fall decor in authenticity. Incorporate dried botanicals, wood slices, woven baskets, jute rugs, and linen fabrics. These elements prevent your seasonal decorating from feeling artificial or overdone. I often use branches from my yard or dried hydrangeas from the garden—they’re free and add genuine seasonal character.
The secret to successful texture layering is variation. Combine smooth velvets with nubby linens, soft wools with rough natural wood, shiny metallics with matte ceramics. This interplay creates the visual interest that makes a room feel professionally styled.
Key Patterns for Fall
Patterns add personality to your fall decor inspiration, but restraint is crucial. Choose one dominant pattern and support it with solids or very subtle secondary patterns:
Plaid and Tartan remain fall classics for good reason. Whether you prefer traditional Scottish tartans or modern buffalo checks, these patterns instantly evoke autumn. Use them on throw pillows, blankets, or even lampshades—but typically not all three in the same space.
Herringbone and Tweed offer sophisticated pattern options that feel less expected than plaid. These work beautifully in upholstery, throw pillows, or even as textured wallpaper in powder rooms.
Botanical Prints featuring fall leaves, branches, or abstract natural motifs can soften a space dominated by geometric patterns. Look for prints that feel artistic rather than literal—think watercolour or oak leaves rather than photographic maple leaves.
Remember that patterns should enhance your existing decor, not compete with it. If your room already features bold patterns, keep fall additions more subdued. If your space is primarily solid colours, this is your opportunity to introduce pattern through seasonal elements.

Room-by-Room Fall Decor Inspiration
Now that we’ve established the foundational elements, let’s explore how to apply these principles throughout your home. Each room presents unique opportunities for seasonal styling, and understanding these nuances makes all the difference between a space that feels thoughtfully designed versus one that’s simply decorated.
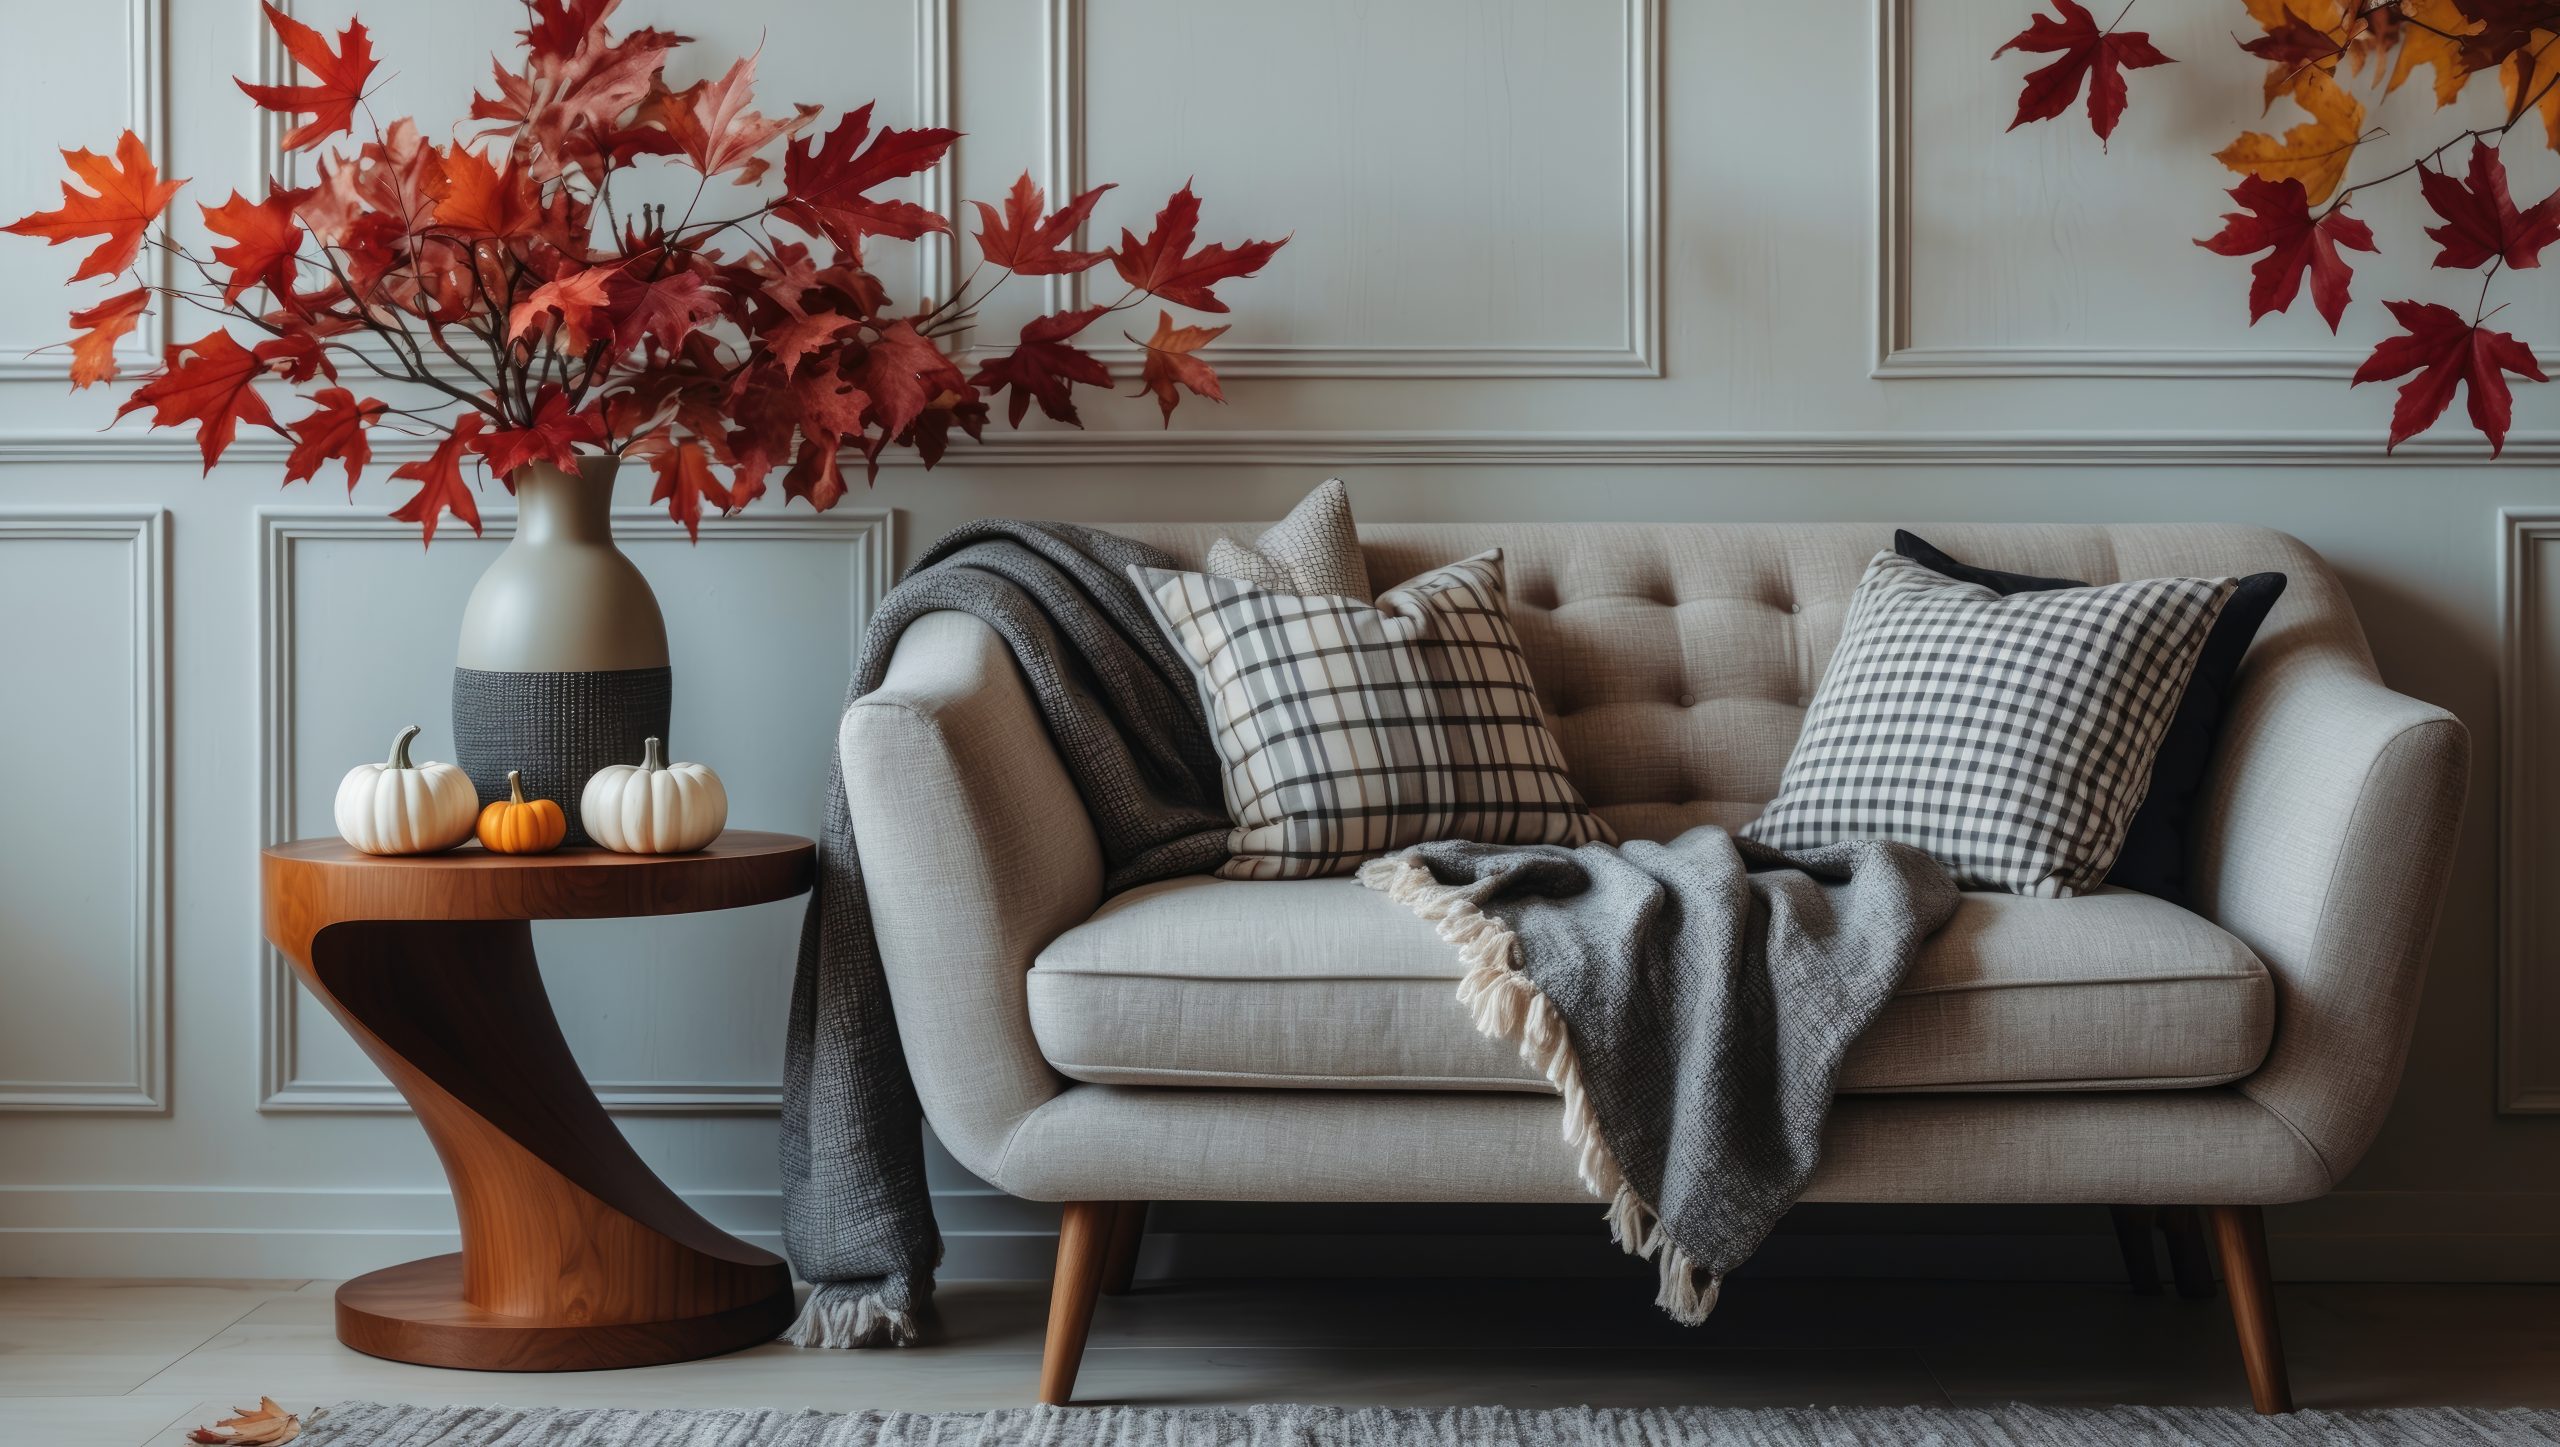
Living Room Transformation
The living room typically serves as the heart of fall gatherings, making it the perfect starting point for your seasonal updates. The key is working with what you already have while adding strategic layers.
Layering Throw Pillows and Blankets is perhaps the easiest way to bring fall decor inspiration to life. Start with your largest pillows in solid, neutral tones as anchors. Add medium-sized pillows in your chosen pattern—maybe that herringbone or plaid we discussed. Finish with smaller accent pillows in rich jewel tones or interesting textures. The magic number is usually odd—three or five pillows per sofa end creates better visual balance than even numbers.
For throws, drape rather than fold. A casually draped chunky knit blanket over the back corner of a sofa looks infinitely more inviting than one folded into a perfect rectangle. Keep additional throws in a basket nearby—both practical for chilly evenings and visually appealing.
Switching Summer Slipcovers might seem like a bigger commitment, but if you already use slipcovers, the seasonal swap makes a dramatic difference. Trade white or light linen covers for warmer tones like camel, rust, or deep grey. The entire room’s atmosphere shifts with this single change.
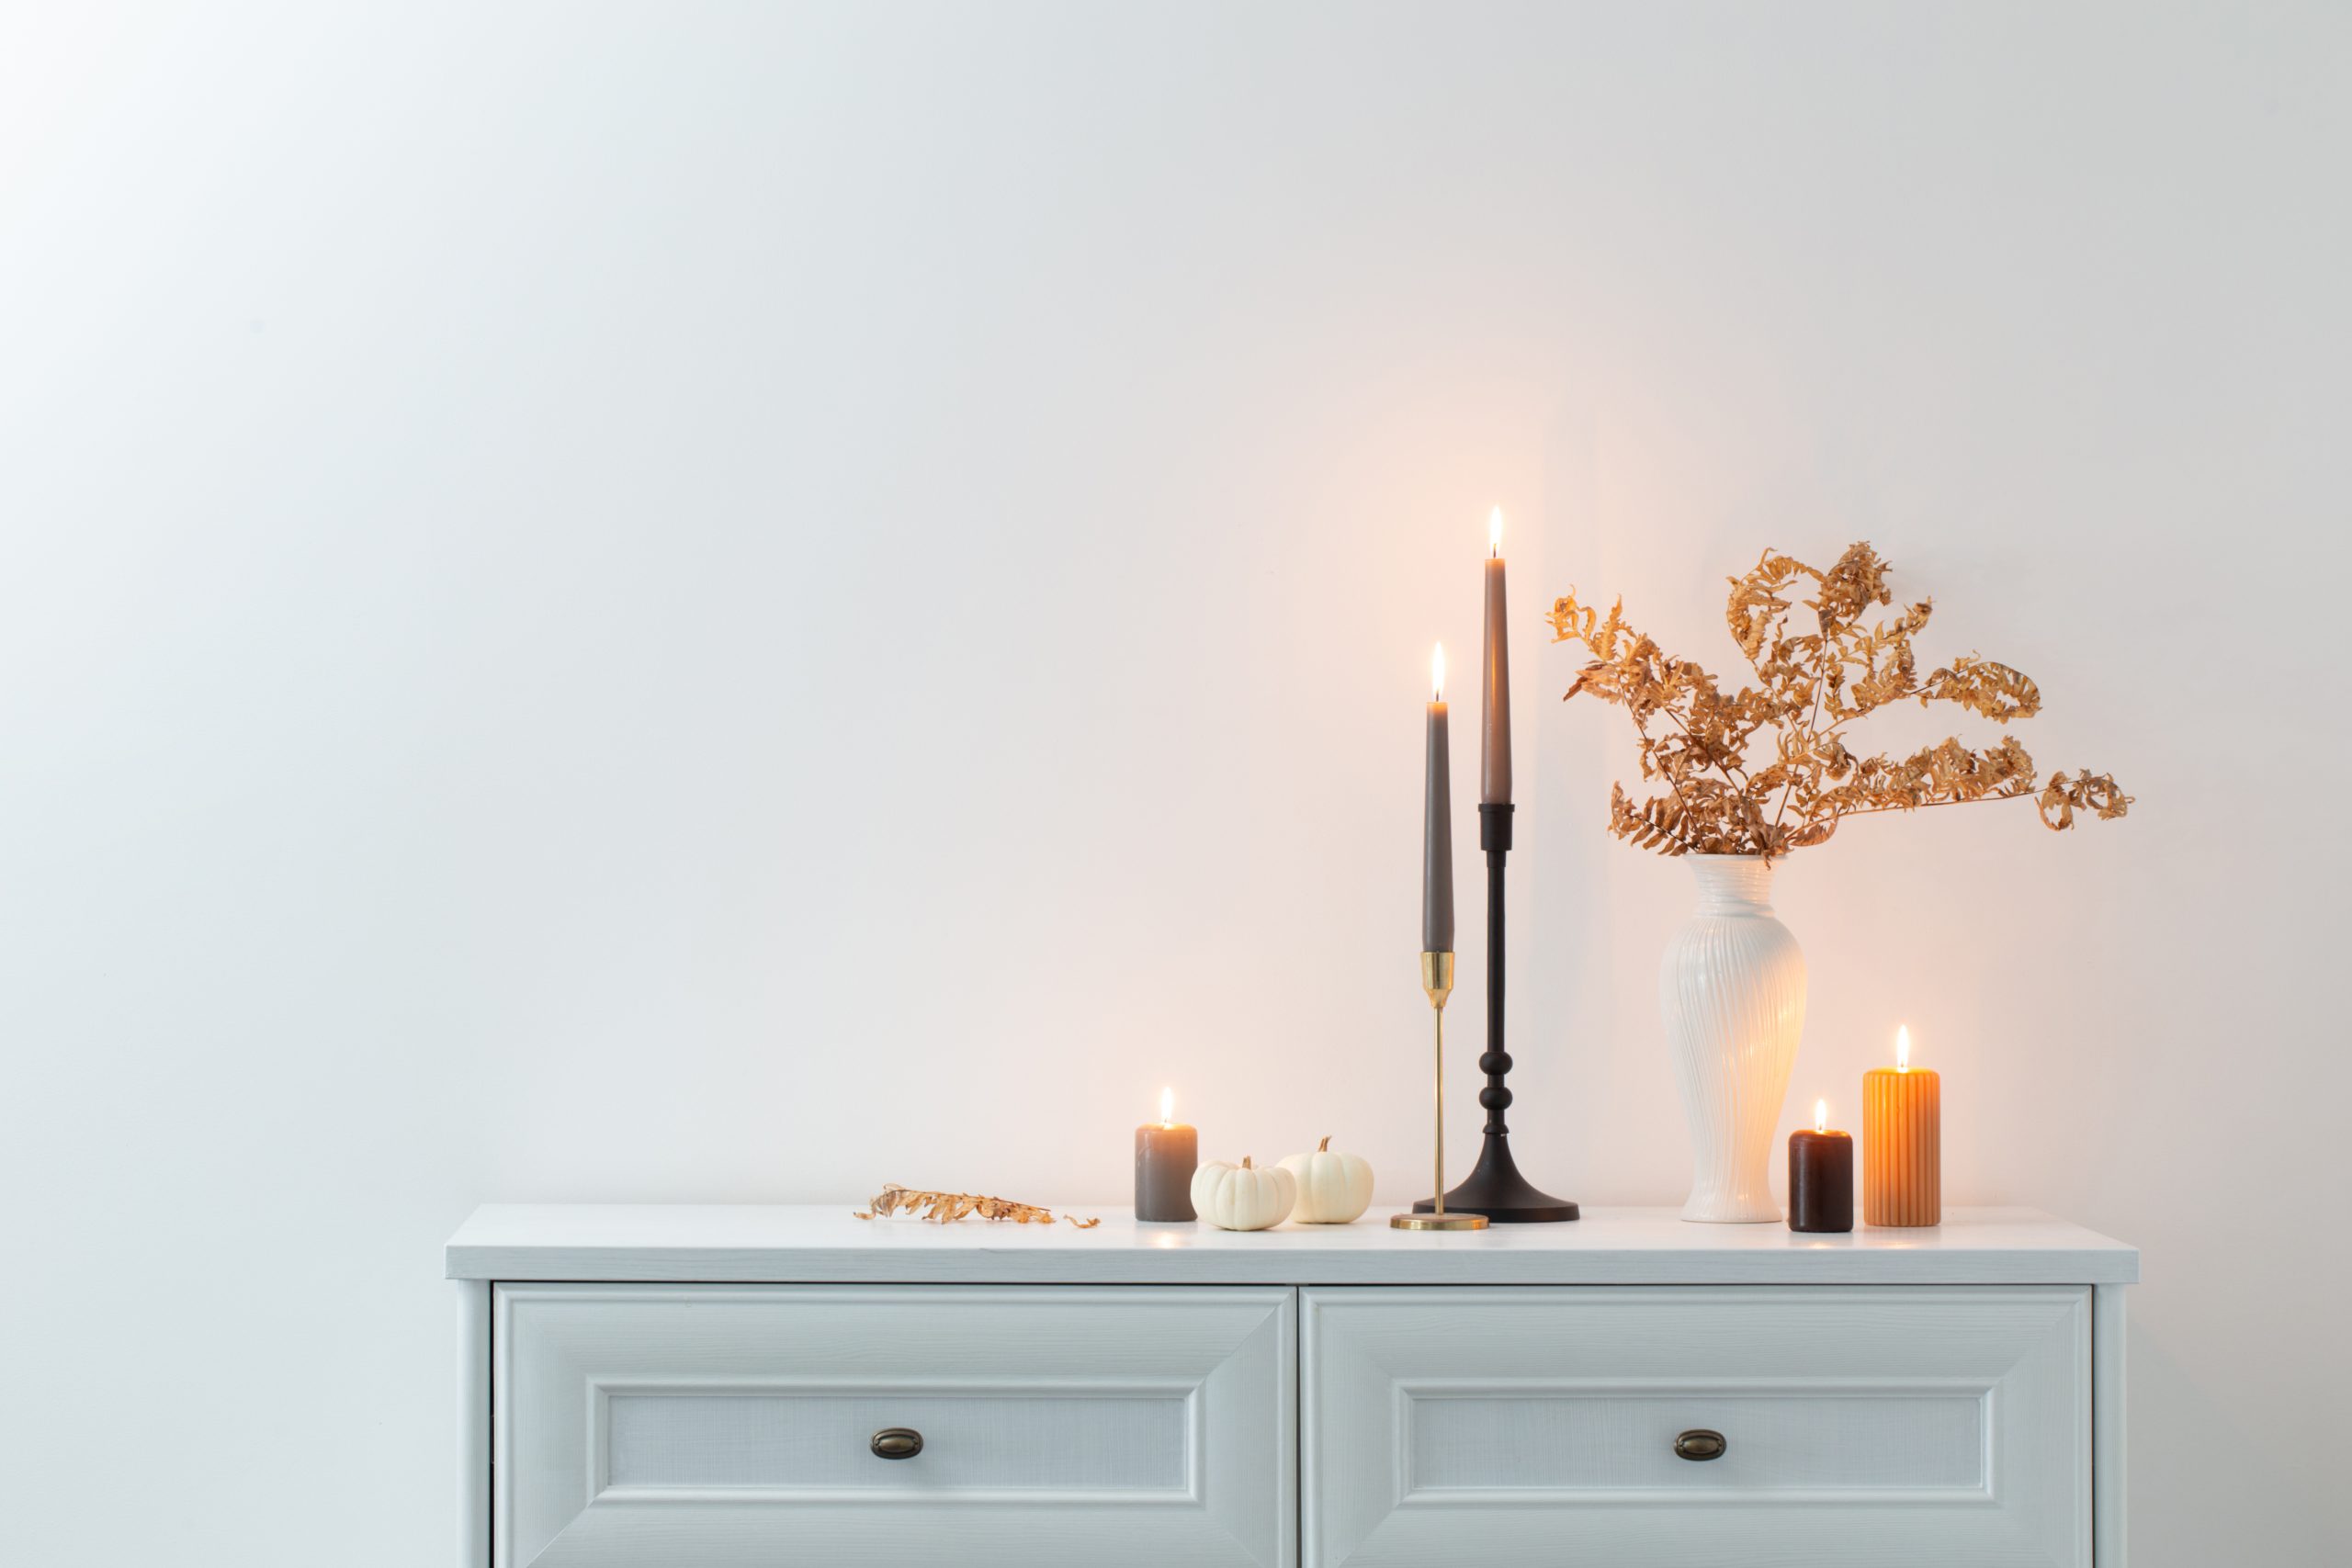
Creating a Focal Point with Fall Mantel Styling requires restraint and intention. Start with varying heights—perhaps birch logs stood on end, hurricane lanterns of different sizes, and cascading greenery. Add preserved fall leaves or branches for natural movement. The trick is creating depth by layering items at different distances from the wall rather than lining everything up like soldiers.
Coffee Table Styling offers another opportunity for fall decor inspiration. Use a wooden tray to corral smaller items—perhaps a trio of small white pumpkins, a brass candlestick, and a small potted succulent. Stack relevant books with warm-toned covers, and add a textural element like a small wooden bowl filled with acorns or pinecones. Keep it functional—leave space for drinks and remotes.

Dining Room Fall Touches
The dining room often gets overlooked between holidays, but fall presents the perfect opportunity to make this space feel special for everyday meals and intimate gatherings alike.
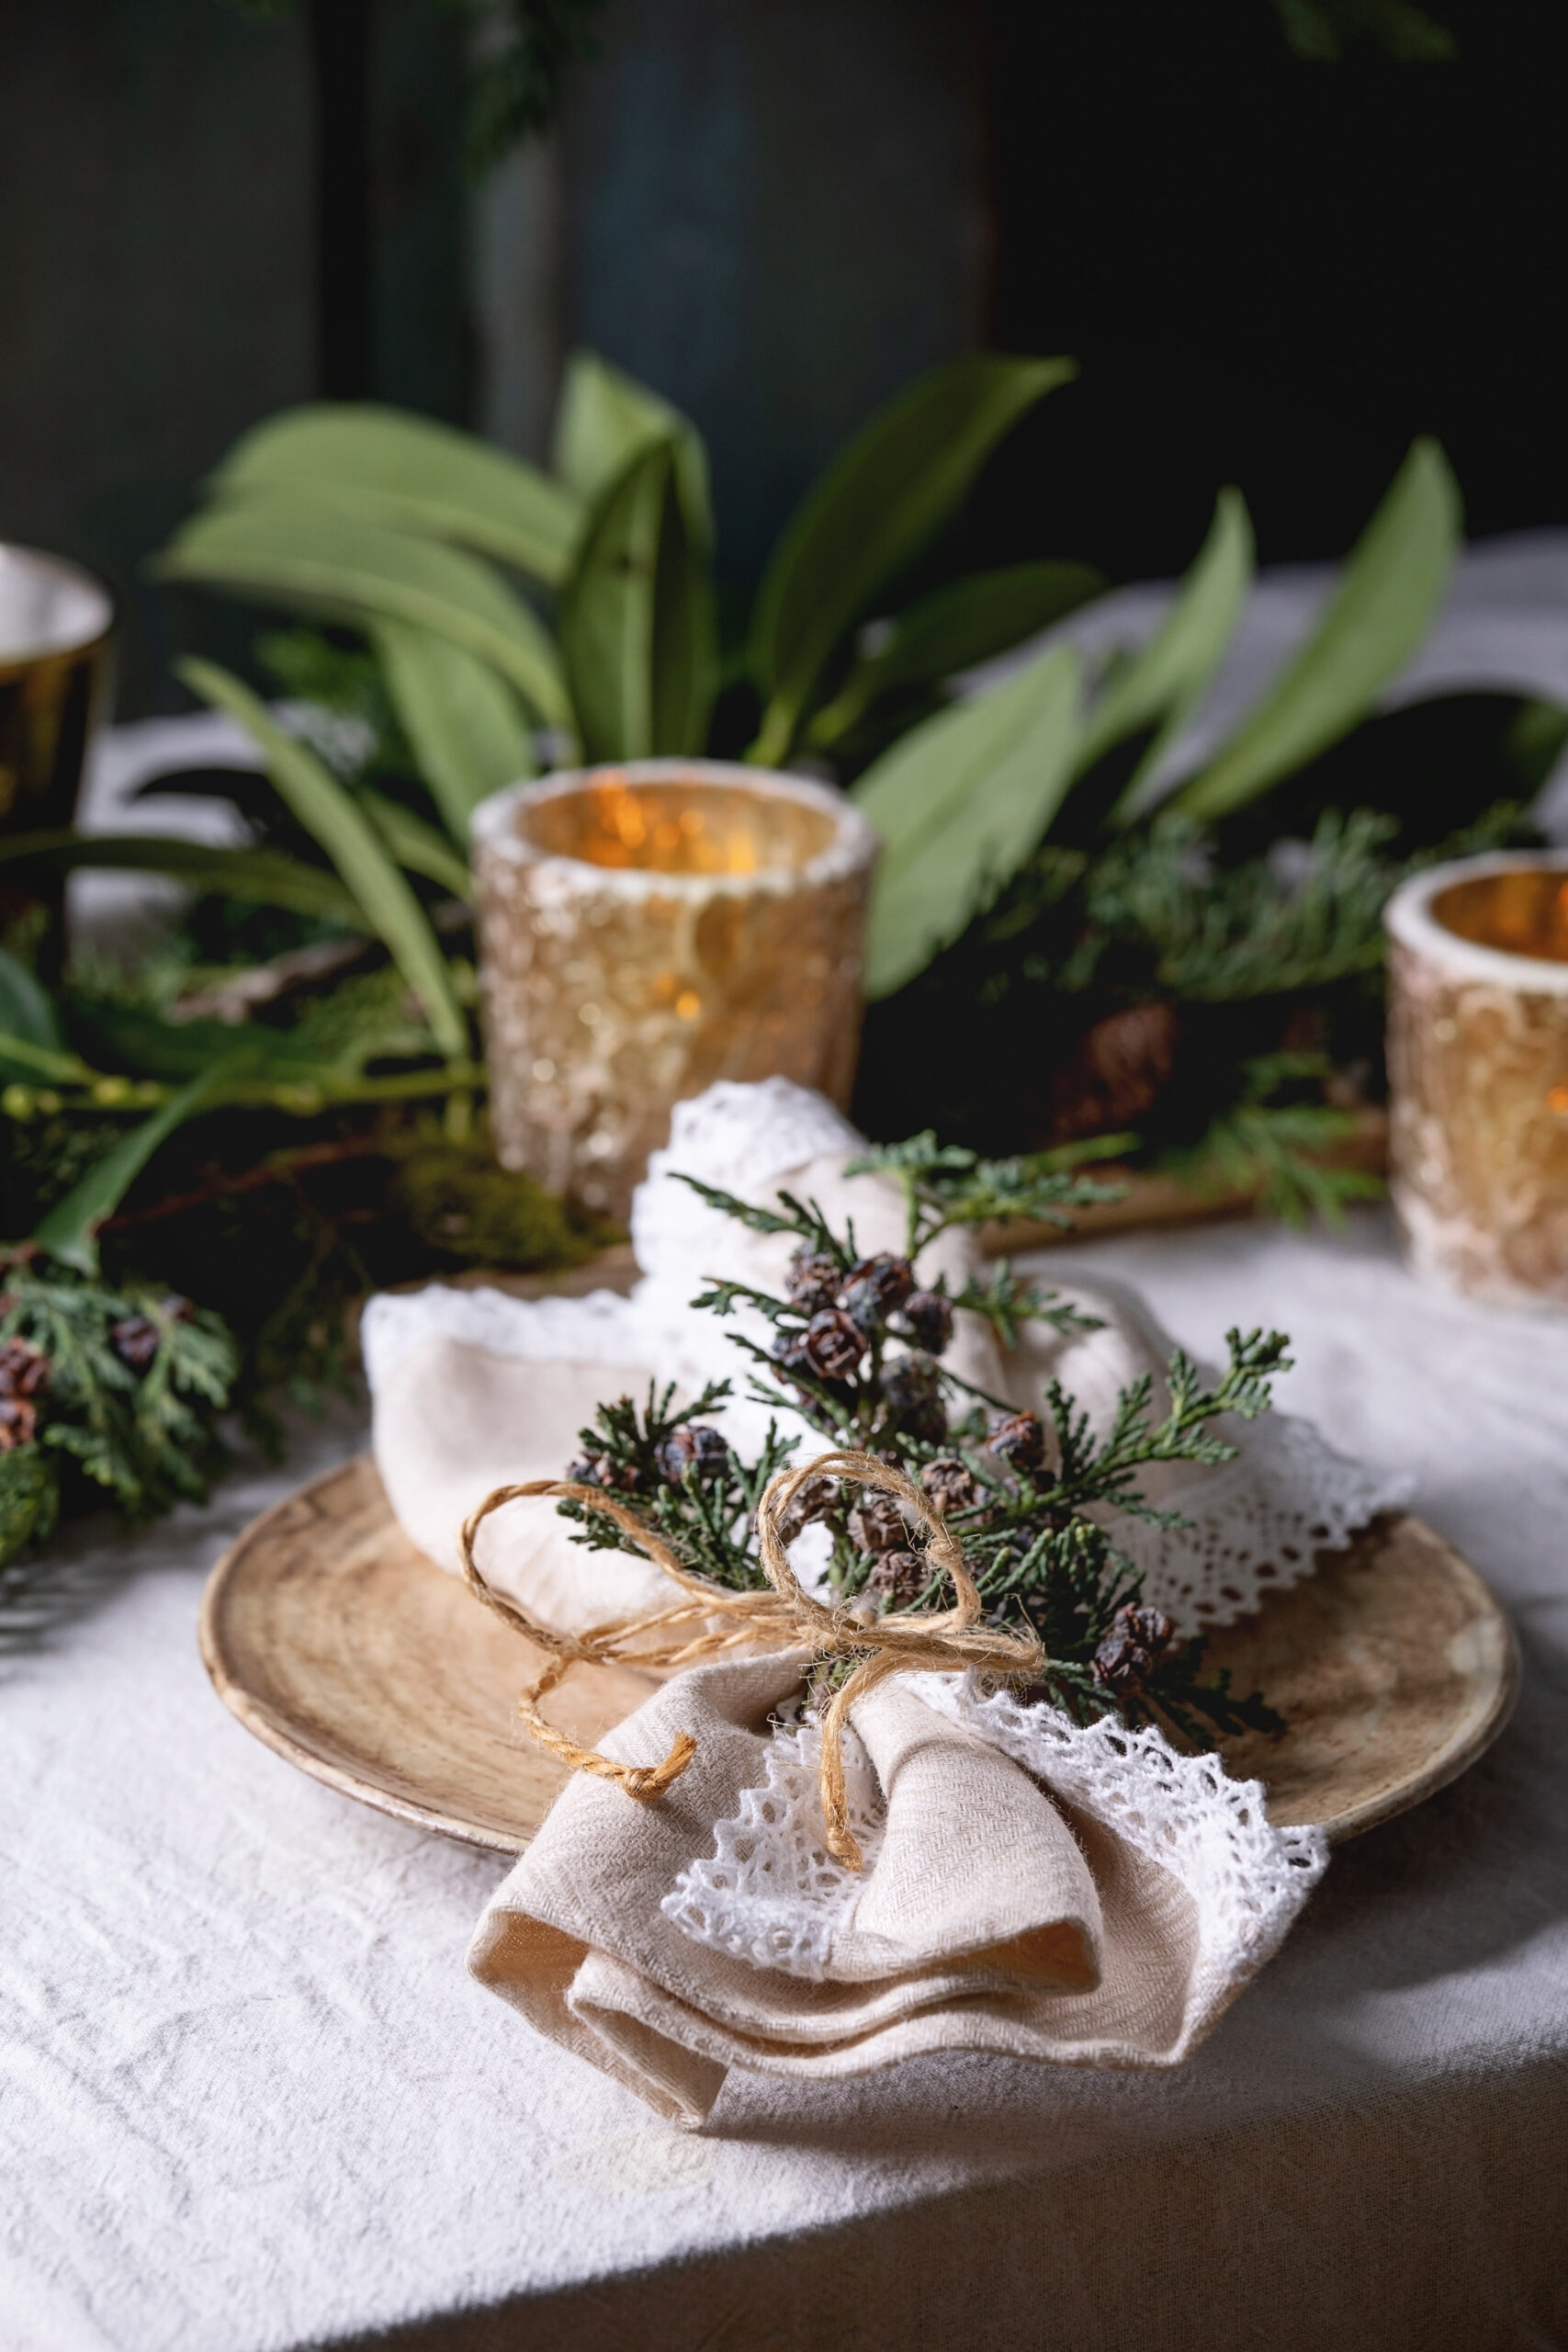
Centrepiece Ideas Using Natural Elements work best when they don’t obstruct conversation. Create a low, linear arrangement down the table’s centre using a mix of mini pumpkins, gourds, and preserved eucalyptus. Weave in battery-operated fairy lights for evening ambience. For round tables, a single elevated arrangement—perhaps branches in a tall vase surrounded by votives—maintains sight lines while adding vertical interest.
Table Setting Inspiration doesn’t require new dishes. Layer what you have: start with natural woven placemats, add your everyday white plates, then top with salad plates in warm metallics or rich colours. Cloth napkins in autumnal tones, tied with jute twine and a sprig of rosemary, elevate even casual dinners. The goal is creating moments of beauty in daily life, not just special occasions.
Updating Dining Chairs can be as simple as adding seat cushions in seasonal fabrics. If your chairs already have upholstered seats, consider having slipcovers made in a fall-appropriate fabric—it’s less expensive than reupholstering and completely reversible.
Lighting Adjustments make an enormous impact on ambience. If you have a dimmer switch, use it. If not, swap clear bulbs for warm-toned ones, and incorporate candles. Taper candles in brass or wooden holders add height and elegance, while votives scattered down the table create intimate pools of light.

Bedroom Cosy Updates
The bedroom might not be where you entertain, but creating a cosy fall retreat here affects how you start and end each day. The approach should be subtle and soothing rather than heavily themed.
Bedding Layers follow a specific formula for both beauty and comfort. Start with your fitted sheet, add a flat sheet (even if you typically skip it in summer), then a lighter blanket, followed by your duvet or comforter. The final layer—a textured throw folded across the foot of the bed—adds visual weight and extra warmth for cold feet. Choose bedding in warm neutrals with perhaps one layer introducing pattern or deeper colour.
Nightstand Styling requires editing. Clear the summer’s lighter accessories and introduce a small lamp with a warm-toned shade, a small dish for jewellery in brass or wood, perhaps a small potted plant like a snake plant or pothos, and one seasonal element—maybe a small ceramic pumpkin or a candle in an autumn scent. The key is maintaining functionality while adding seasonal warmth.
Window Treatment Updates don’t necessarily mean new curtains. If you have sheers for summer, layer heavier panels over them for fall. This creates better insulation and adds visual weight to the room. If new panels aren’t in the budget, simply swapping out curtain ties for ones in fall colours or textures can refresh the look.
Creating a Reading Nook capitalises on fall’s earlier evenings. Position a comfortable chair near a window, add a soft throw and a lumbar pillow in a fall pattern. Place a small side table within reach for books and beverages, and ensure good lighting—either a floor lamp or table lamp with a warm bulb. This intentional space becomes a retreat within a retreat.

Kitchen & Entryway Details
These transitional spaces offer perfect opportunities for fall decor inspiration that’s both functional and welcoming.
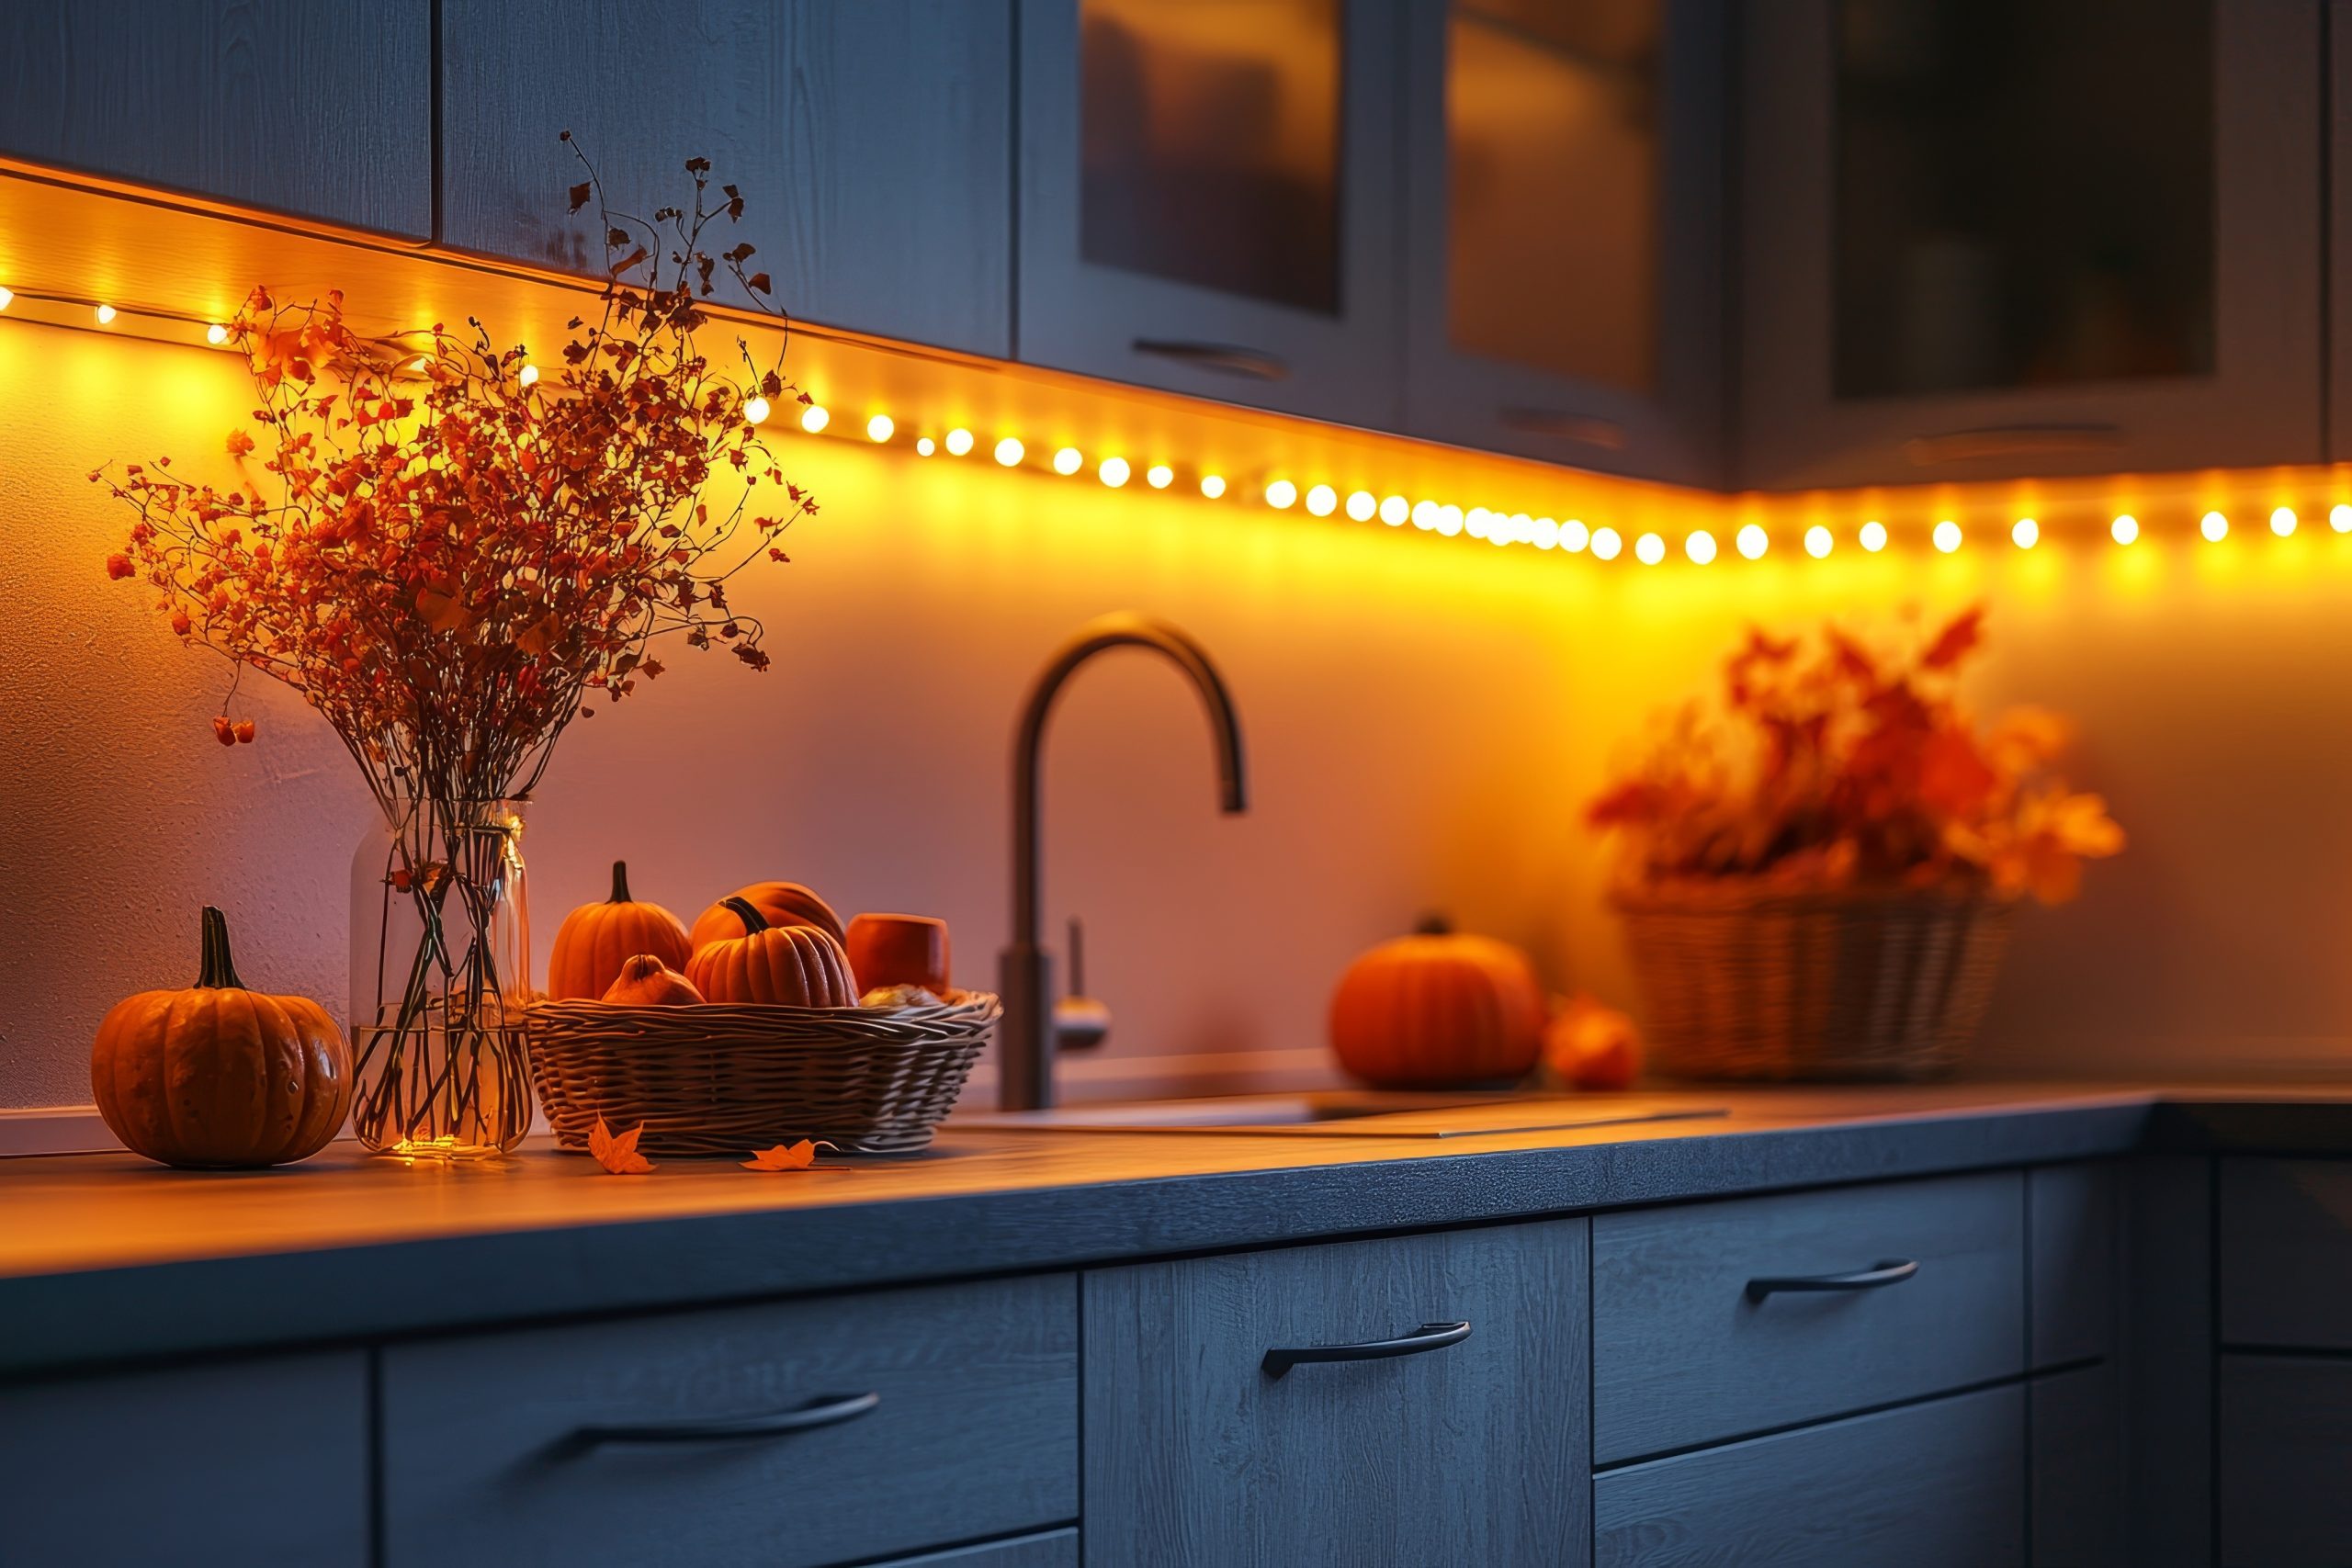
Seasonal Kitchen Textiles provide instant updates without cluttering counters. Swap dish towels for ones in fall colours or patterns—burnt orange, deep red, or classic plaid. Add a runner to your kitchen island or peninsula in a warm, textured fabric. Replace summer’s bright oven mittens with ones in rich autumn hues. These functional items do double duty as decor.
Fall Produce as Decor serves both aesthetic and practical purposes. A wooden bowl filled with apples, pears, or pomegranates adds colour and encourages healthy snacking. Small pumpkins and gourds clustered on a cutting board create an instant vignette. Just remember to use or compost them before they spoil—nothing ruins fall ambience quite like rotting produce.
Entryway Console Styling sets the tone for your entire home. Layer a textured runner on the console, add a lamp with a warm-toned shade, and create a vignette with varying heights—perhaps a tall vase with branches, a medium-sized decorative box for keys, and a small dish for loose change. A mirror above reflects light and makes the space feel larger while providing that last-minute appearance check.
Doorway and Porch Transitions should feel cohesive with your interior choices. If you’ve used lots of natural elements inside, continue that theme with potted mums, ornamental kale, or a simple arrangement of corn stalks. A layered doormat approach—a larger neutral jute mat with a smaller printed seasonal mat on top—adds interest while maintaining functionality. Keep scale in mind; a tiny pumpkin on a large porch looks lost, while oversized decorations can overwhelm a small stoop.

Professional Styling Tips for Fall Decor
After years of creating seasonal interiors, I’ve developed certain techniques that consistently deliver polished results. These aren’t rules as much as reliable strategies that help achieve that “pulled together” look many people struggle to define.
The Rule of Three
This classic design principle applies beautifully to fall decor inspiration. Our brains naturally find odd numbers more appealing and easier to process than even groupings.
Grouping Objects for Visual Impact means thinking beyond individual pieces. Three mercury glass pumpkins of varying sizes create more interest than one large statement piece. When styling a mantel or shelf, create multiple groupings of three—perhaps three candlesticks on one end, three small gourds clustered in the centre, and a trio of preserved leaf stems on the other end.
Varying Heights and Textures within each grouping prevent monotony. If you’re arranging three pumpkins, choose different varieties—maybe one velvet, one ceramic, and one natural white pumpkin. Vary their heights by placing one on a small stack of books or a wooden riser.
Creating Vignettes Throughout the Home extends this principle beyond individual surfaces. Think of each room as needing three points of seasonal interest—in a living room, that might be the mantel, coffee table, and a side table. This creates a visual flow that guides the eye around the space.
Lighting for Autumn Ambience
Lighting often gets overlooked in seasonal decorating, but it’s absolutely crucial for achieving that warm, inviting atmosphere we associate with fall.
Layering Light Sources creates depth and eliminates harsh shadows. Combine overhead lighting (on dimmers when possible), table or floor lamps, and candles. Each source serves a purpose—overhead for general illumination, lamps for task lighting and ambient glow, candles for flickering warmth and scent.
Warm Bulb Recommendations make an immediate difference. Look for bulbs labelled “warm white” or “soft white” with a colour temperature of 2700K-3000K. These emit a golden glow that complements fall colours beautifully. Avoid anything labelled “daylight” or “cool white” during fall months—they’ll make your carefully chosen warm tones look flat and uninviting.
Candle Placement Strategies require both aesthetic consideration and safety awareness. Group pillar candles of varying heights on a tray, place votives in glass holders along a mantel, or use battery-operated candles in lanterns where real flames aren’t practical. The goal is to create pools of warm light at different levels throughout the room.

Bringing Nature Indoors
Nothing authentically captures fall decor inspiration quite like natural elements. The key is selecting materials that maintain their beauty as they dry or age.
Preserved Leaf Arrangements work best when you choose leaves at their peak colour and preserve them properly. Glycerin-preserved leaves maintain flexibility and colour far longer than those that simply dry out. Arrange them in tall vases, weave them into garlands, or scatter individual specimens across a table runner.
Branch and Twig Displays add architectural interest to any arrangement. Curly willow, birch branches, or even interesting fallen branches from your yard create height and movement. Spray them with clear sealant to prevent bark from flaking in your home.
Incorporating Pumpkins Beyond Orange expands your design possibilities dramatically. White pumpkins offer elegance, sage green varieties complement neutral palettes, and deep burgundy heirloom varieties add unexpected richness. Mix real and high-quality faux versions—guests rarely notice the difference, and you’ll extend your decorating timeline.
Dried Flower Arrangements provide lasting beauty with zero maintenance. Hydrangeas, wheat stalks, pampas grass, and ornamental grasses all dry beautifully. Combine different textures and heights for arrangements that feel gathered rather than purchased.

Budget-Friendly Fall Decor Inspiration Ideas
Creating a beautifully decorated fall home doesn’t require a designer budget. Some of my favourite seasonal touches cost little to nothing, relying more on creativity and strategic choices than spending.
DIY Projects Worth Your Time
Not every DIY project delivers professional-looking results, but these consistently do:
No-Sew Pillow Covers transform existing pillows instantly. Purchase fabric in fall patterns or textures, cut to size leaving extra for fold-overs, and use fabric tape or safety pins to secure. When the season ends, simply remove and store flat—far more space-efficient than storing entire pillows.
Mason Jar Luminaries create ambient lighting for pennies. Wrap jars with twine, add a battery-operated tea light, and fill with small seasonal elements like acorns or mini pinecones. Line them along a mantel or cluster on a tray for instant ambience.
Painted Pumpkin Alternatives let you customise colours to match your exact decor. Use chalk paint for a matte finish, metallic spray paint for glamour, or even chalkboard paint for pumpkins you can personalise with different messages throughout the season.
Foraged Material Arrangements cost nothing but time. Collect interesting branches, colourful leaves, pine cones, and acorns during walks. Arrange them in containers you already own, or simply pile them in a wooden bowl for an organic centrepiece.
Smart Shopping Strategies
Strategic shopping ensures you build a collection of quality seasonal items without overspending:
Items to Invest In vs. Temporary Pieces: Invest in neutral, high-quality basics like wool throws, versatile pillow covers, and well-made candle holders that work across seasons. Save money on trendy items, specific holiday motifs, or anything that screams “fall 2024” rather than timeless autumn.
Shopping Timeline for Best Deals: Shop end-of-season sales for next year’s decor—you’ll find 50-75% off quality items. For current season needs, shop in early September for the best selection, or wait until mid-October when retailers start discounting to make room for holiday merchandise.
Versatile Pieces That Transition to Winter: Choose items in rich neutrals, metallic finishes, or natural materials that work for both fall and winter. A chunky knit throw in cream, brass candlesticks, or wooden serving pieces provides value across multiple seasons.

Common Fall Decorating Mistakes to Avoid
Even with the best fall decor inspiration, certain pitfalls can derail your efforts. Understanding these common mistakes helps you sidestep them entirely.
Over-theming
The fastest way to make your home feel like a seasonal store display rather than a lived-in space is going overboard with themed elements.
Balancing Seasonal Elements with Existing Decor requires a light touch. Your fall additions should enhance your home’s existing style, not override it. If you have a modern minimalist space, a few carefully chosen natural elements and textured throws maintain your aesthetic while nodding to the season. For traditional homes, you have more leeway with pattern and colour, but the key is still integration rather than domination.
Avoiding the “Costume Party” Aesthetic means stepping back and evaluating your choices. If every surface features pumpkins, every textile screams “autumn leaves,” and you’ve replaced all your regular artwork with fall-themed prints, you’ve likely crossed the line. The goal is a home that feels seasonally appropriate, not a harvest festival booth.
Ignoring Scale and Proportion
Nothing undermines professional-looking decor faster than scale mistakes. This applies to everything from individual accessories to overall room composition.
Right-sizing Decorations for Your Space requires honest assessment. A massive pumpkin topiary might look stunning in a two-story foyer but ridiculous on a small console table. In contrast, tiny decorative elements get lost in large spaces. When in doubt, group smaller items together to create more visual weight, or choose fewer, larger pieces for impact.
Maintaining Visual Balance means considering the entire room, not just individual vignettes. If you create an elaborate fall display on one side of the room, balance it with simpler seasonal touches on the opposite side. This prevents the space from feeling lopsided or forcing guests to crane their necks in one direction.
Forgetting Functionality
Beautiful fall decor that interferes with daily life won’t last long before frustration sets in.
Keeping Spaces Livable While Decorated should be your primary concern. Coffee tables still need space for coffee cups. Kitchen counters require work areas. Entryway tables need room for keys and mail. Build your fall decor inspiration around how you actually use each space, not some idealised version where no one ever needs to set anything down.
Storage Solutions for Seasonal Items deserve consideration before you buy. Those gorgeous oversized glass pumpkins look wonderful in October, but where will they live the other eleven months? Prioritise items that store efficiently—fabric pieces that fold flat, nestable containers, or decorations that work across multiple seasons.
Transitioning Your Fall Decor Through the Season
Fall spans several months and holidays, each with its own character. Smart decorating acknowledges these shifts without requiring complete overhauls.
Early Fall (September-October)
Light Touches and Natural Elements work best when summer’s heat still lingers. Focus on bringing in texture through throws and pillows while keeping colour changes subtle. Fresh apples in bowls, sunflowers in vases, and lighter autumn colours like gold and coral bridge the gap between seasons gracefully.
Focus on Harvest Themes without going full Halloween. Wheat bundles, corn husks, and early autumn leaves celebrate the season’s agricultural roots. Save the darker colours and heavier textures for when temperatures truly drop.
Late Fall (November-December)
Deeper Colours and Richer Textures feel appropriate as daylight continues to shorten. Now’s the time for those burgundy velvets, forest green accents, and layered wool blankets. Replace early fall’s fresh flowers with preserved arrangements or branches with berries.
Easy Transitions to Holiday Decor save time and money. Choose fall elements that complement your holiday palette—metallic pumpkins work beautifully with Christmas metallics, burgundy throws transition seamlessly to holiday reds, and natural greenery provides a foundation for both seasons. Simply adding twinkle lights to existing fall branches or replacing pumpkins with ornaments in similar colours creates continuity.

Creating a warm, inviting home for fall doesn’t require completely reimagining your space or spending beyond your means. The best fall decor inspiration comes from understanding fundamental design principles—colour, texture, scale, and balance—then applying them thoughtfully to your unique home.

by Kesaa Interiors | Seasonal & Holiday Decor, STYLES & TRENDS
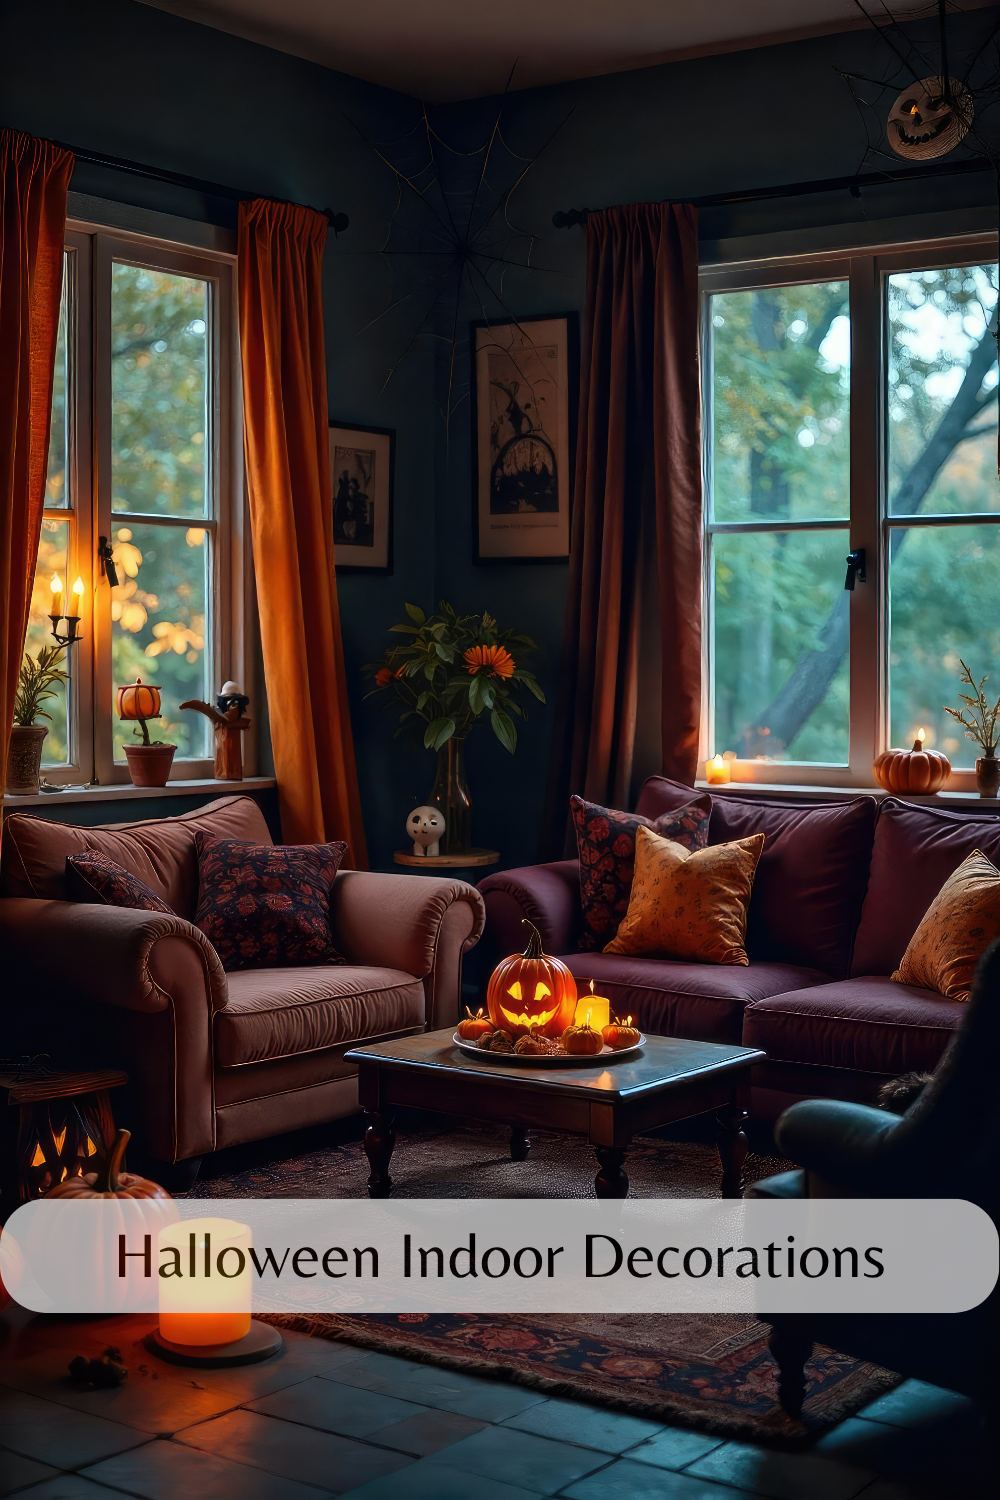
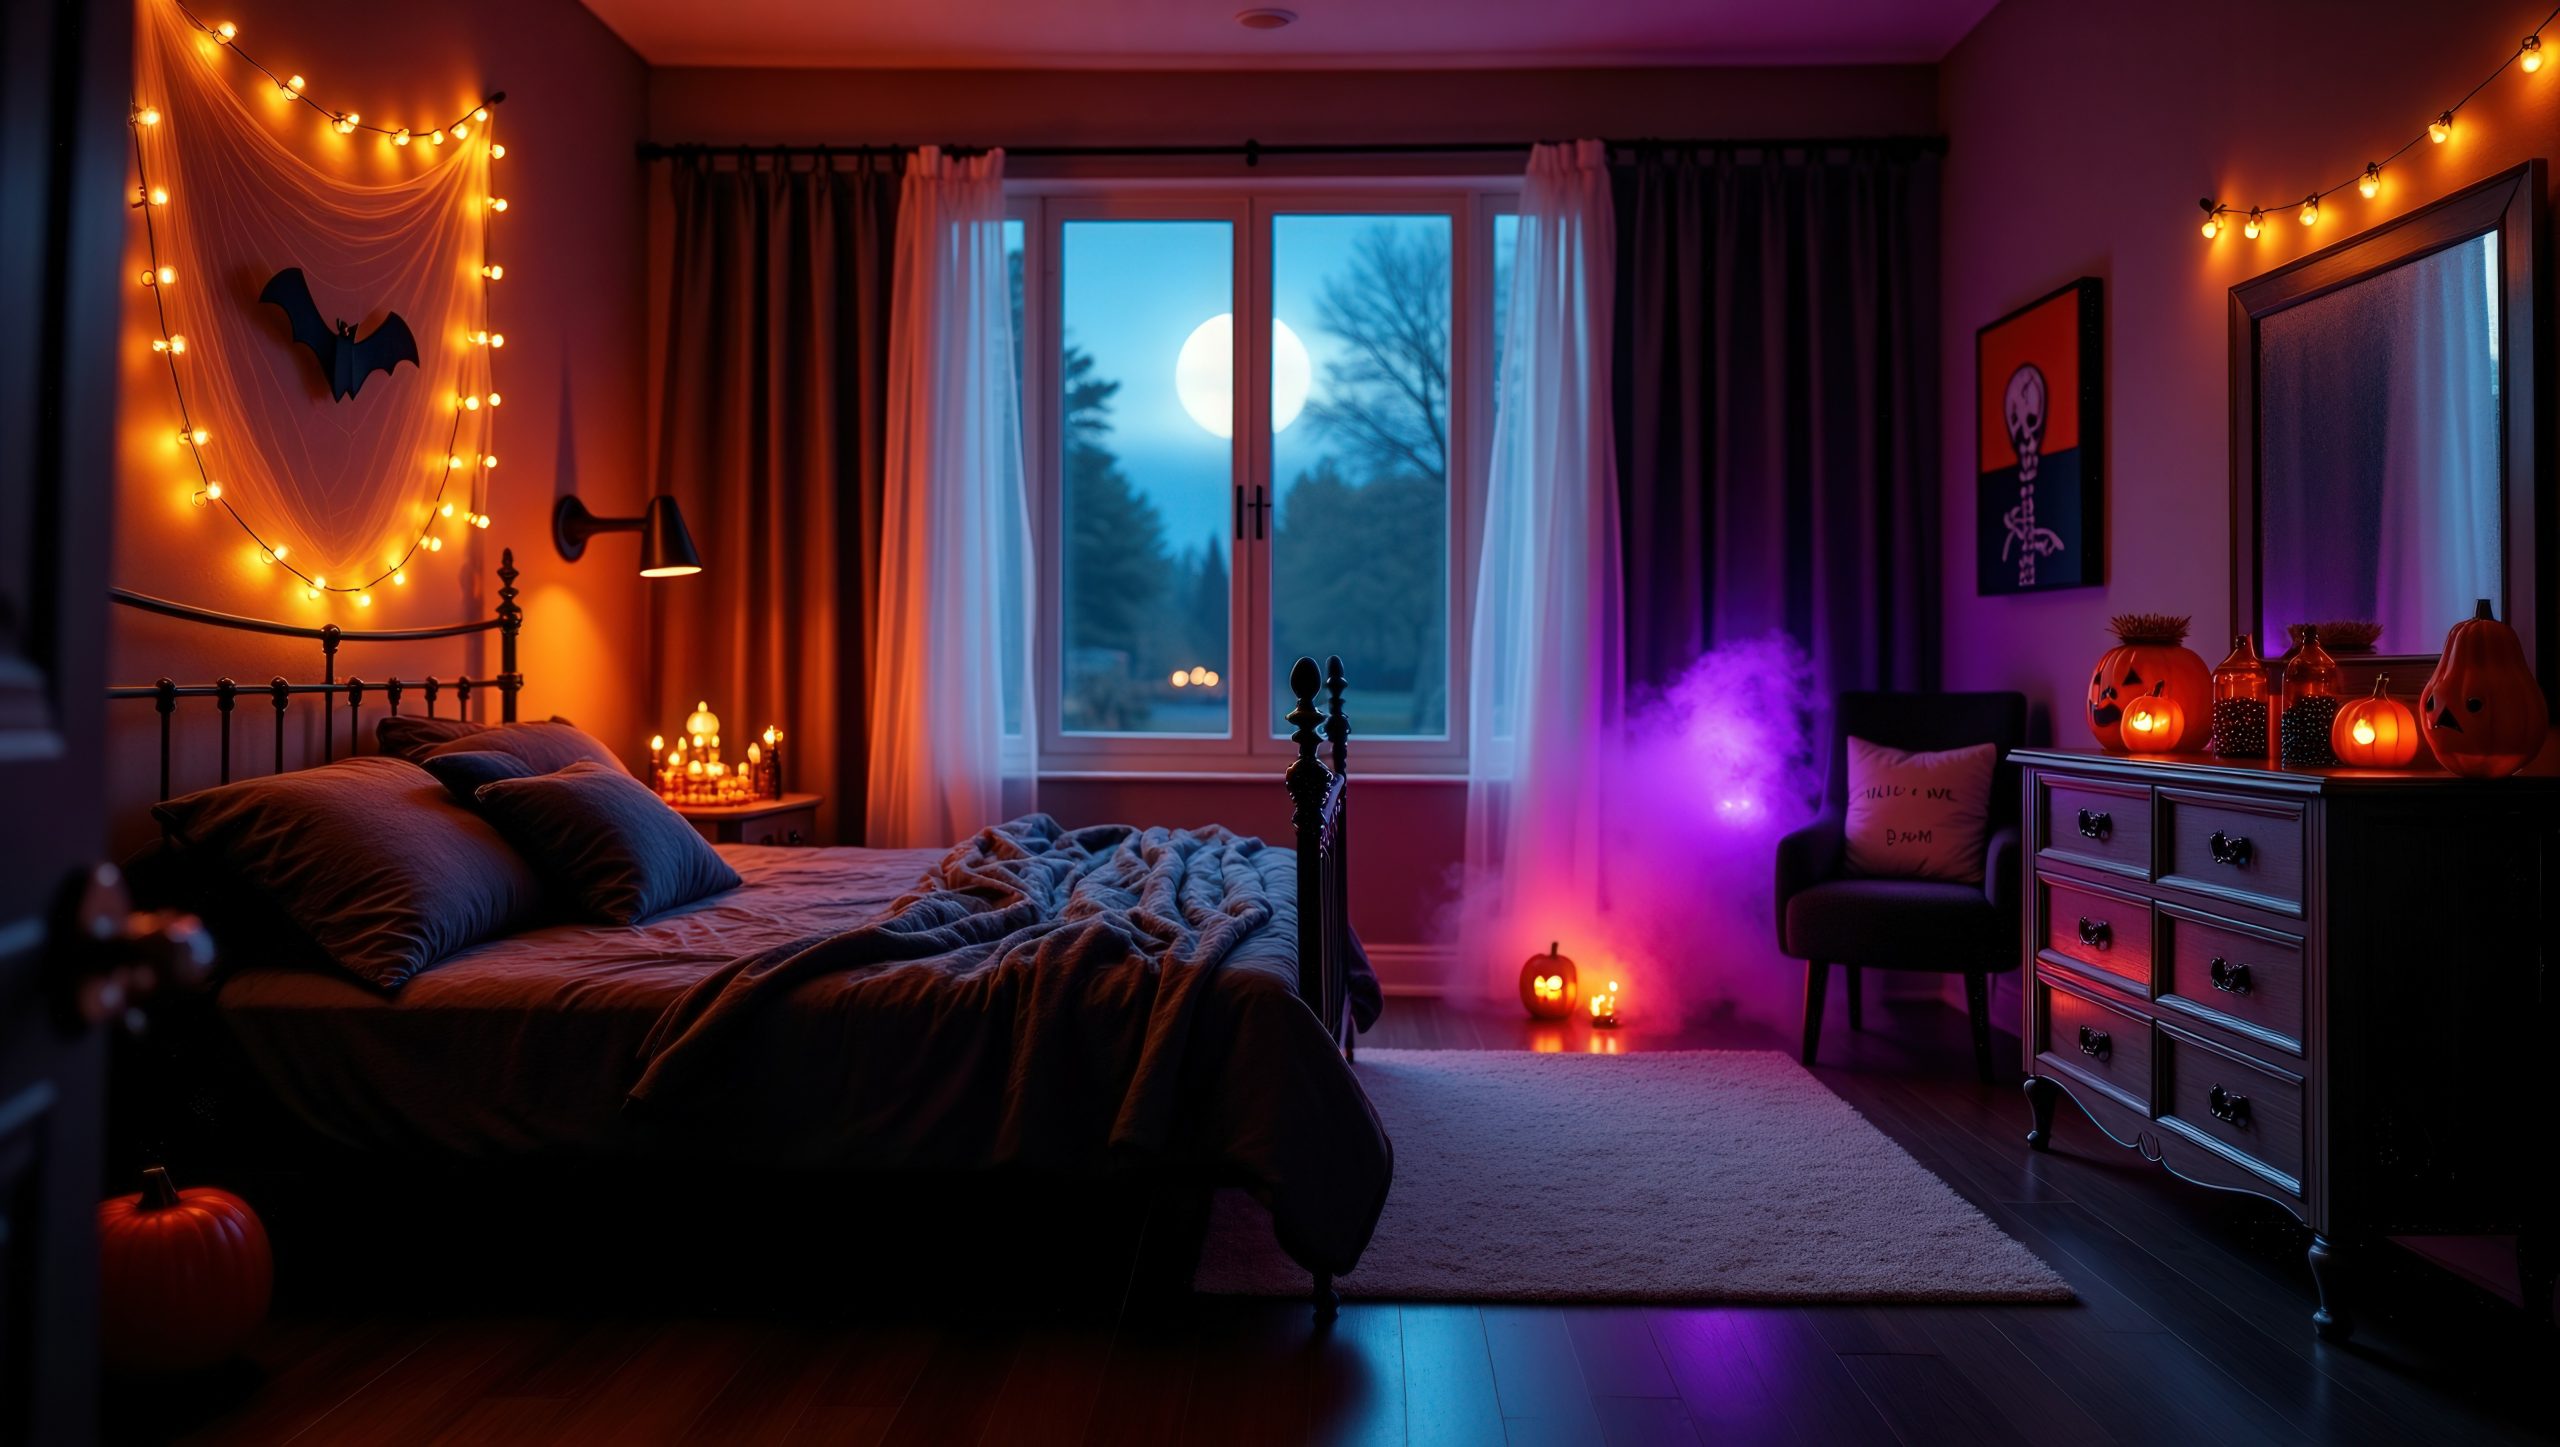
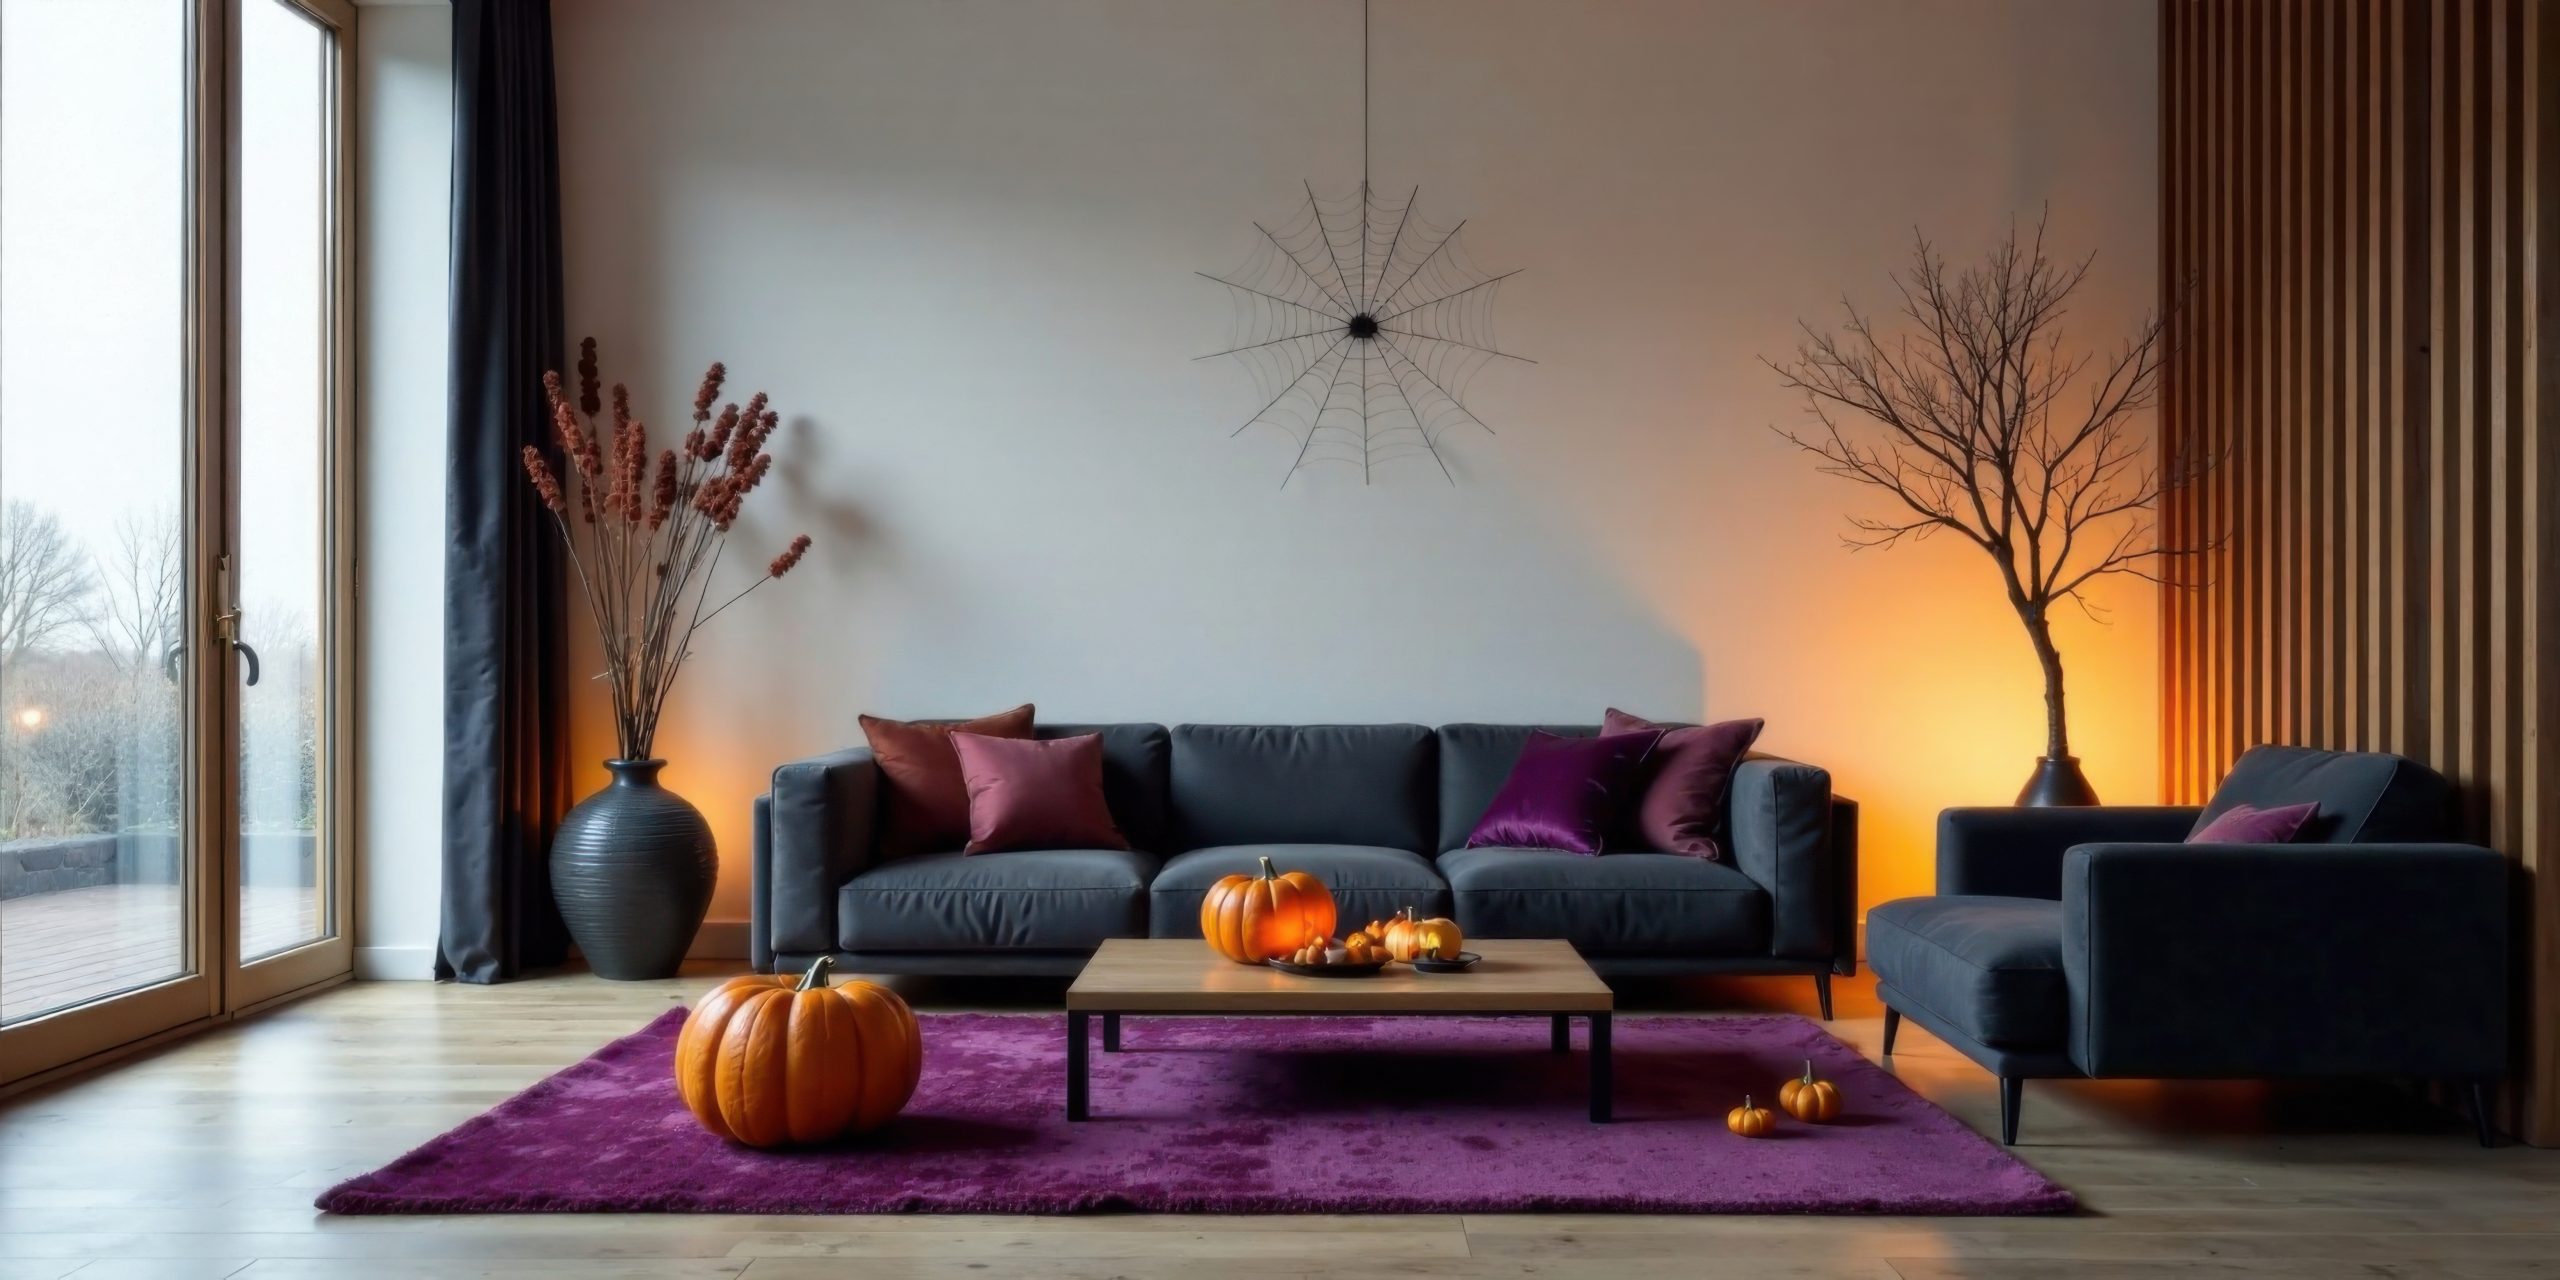
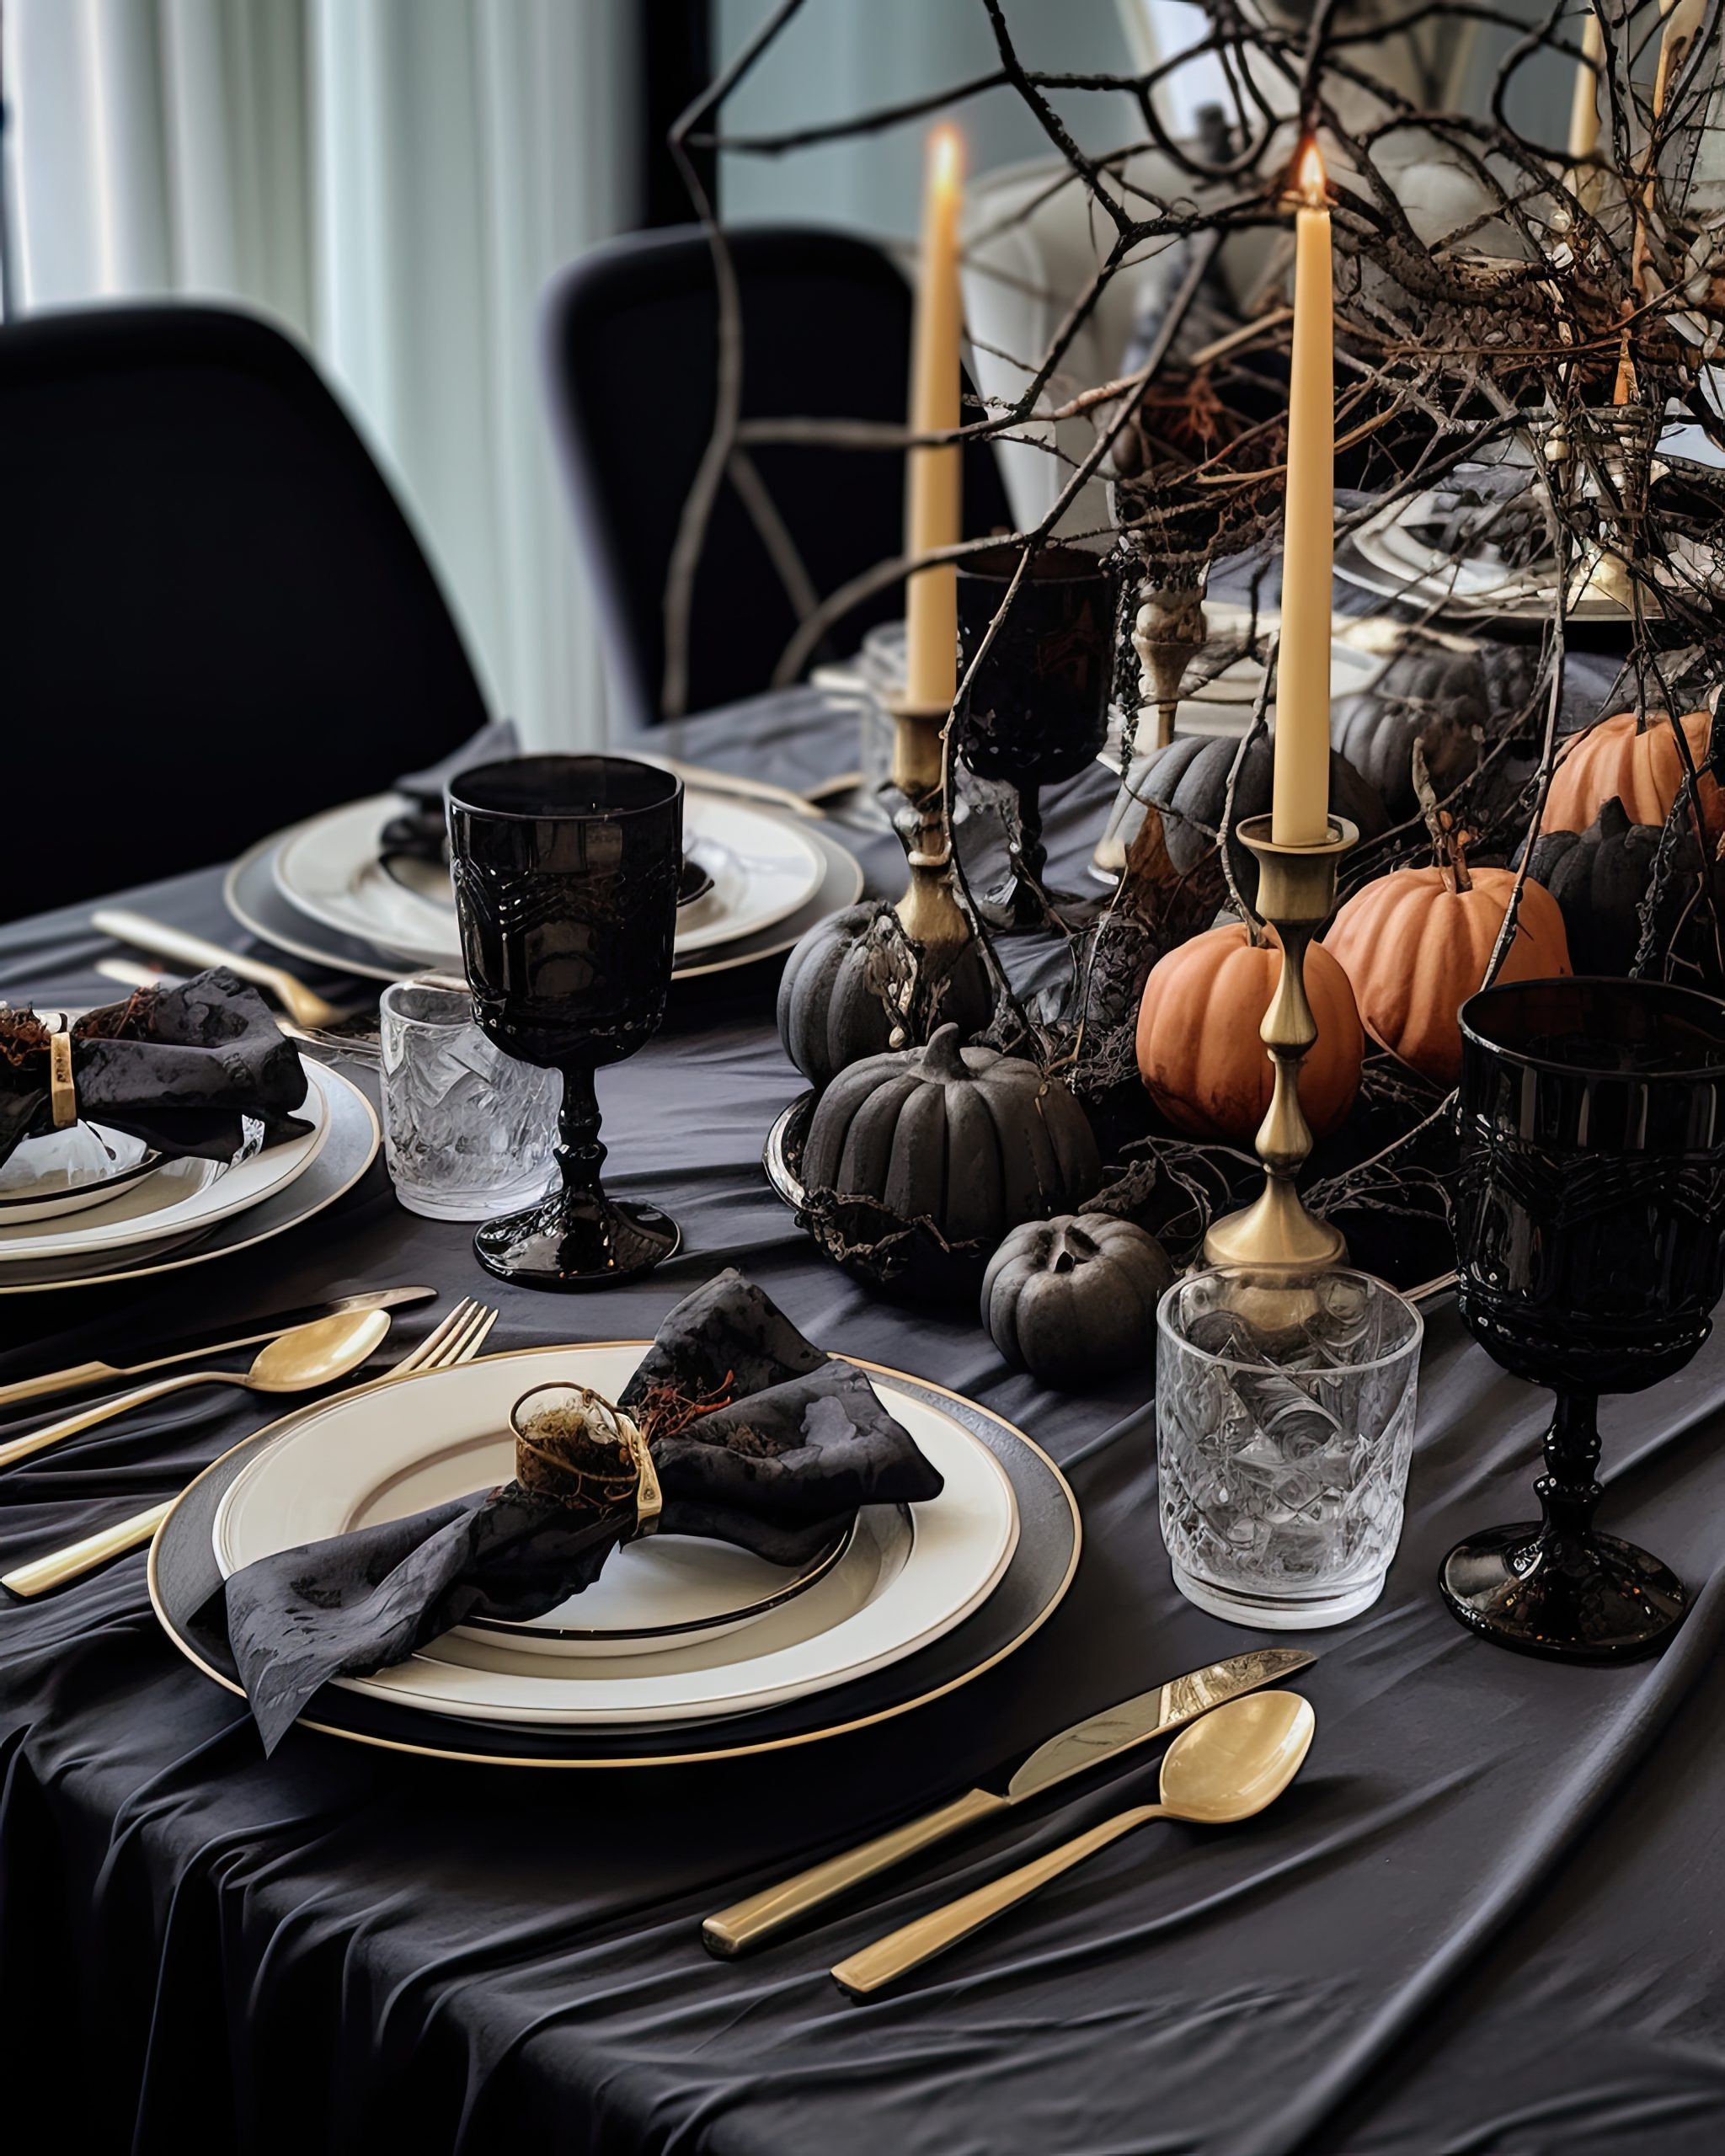
This post is all about Halloween Indoor Decorations.
As an interior designer, I genuinely look forward to October every year. It’s the one time when dramatic transformations aren’t just welcomed—they’re expected. Halloween indoor decorations offer this unique opportunity to completely reimagine our living spaces, pushing creative boundaries while exploring darker, moodier aesthetics that might feel too bold during other seasons.
The best part about designing for Halloween is finding that sweet spot between spine-tingling atmosphere and sophisticated style. You don’t have to turn your home into a discount store Halloween aisle to achieve that perfectly haunted ambience. With the right approach, Halloween indoor decorations can enhance your existing design rather than fight against it.
Over the years, I’ve developed strategies that allow homeowners to create genuinely impressive Halloween transformations without sacrificing the integrity of their year-round design choices. The key lies in understanding how colour, lighting, and strategic placement work together to build atmosphere while maintaining a cohesive look throughout your home.
Setting the Foundation: Colour Schemes and Lighting
Professional Colour Palettes Beyond Orange and Black
Let’s address the elephant in the room—or should I say the jack-o’-lantern. While orange and black have their place in Halloween decorating, relying solely on this combination can make your space feel more like a party store than a thoughtfully designed home. Instead, consider building your Halloween indoor decorations around a more sophisticated palette.
Deep purples paired with charcoal grey create an aristocratic vampire’s lair vibe. Burgundy and forest green evoke Victorian Gothic elegance. Even monochromatic schemes using various shades of black, grey, and white can be incredibly striking when they’re done right. The trick is working with colours that complement your existing furniture and wall colours rather than competing with them.
Metallic accents deserve special attention here. Copper candlesticks, antiqued bronze picture frames, and tarnished silver serving pieces all contribute to that aged, mysterious atmosphere without screaming “Halloween.” These elements work beautifully as Halloween indoor decorations because they feel intentional and curated rather than temporary.
When selecting your colour scheme, consider your home’s natural lighting. North-facing rooms already have cooler light, making them perfect for silver and blue-toned decorations. South-facing spaces with warmer light can handle those rich burgundies and deep golds without feeling too heavy.
Atmospheric Lighting Techniques
If colour sets the stage, lighting is what brings the performance to life. The most common mistake I see people make with Halloween indoor decorations is relying on overhead lighting alone. Atmospheric lighting requires layers, and October is the perfect time to experiment with this design principle.
Start with ambient lighting as your base. This might mean swapping out your regular bulbs for warmer, dimmer options or investing in smart bulbs that can shift to deep reds or purples. I keep a set of colored bulbs specifically for Halloween that I rotate into table lamps and sconces throughout the house.
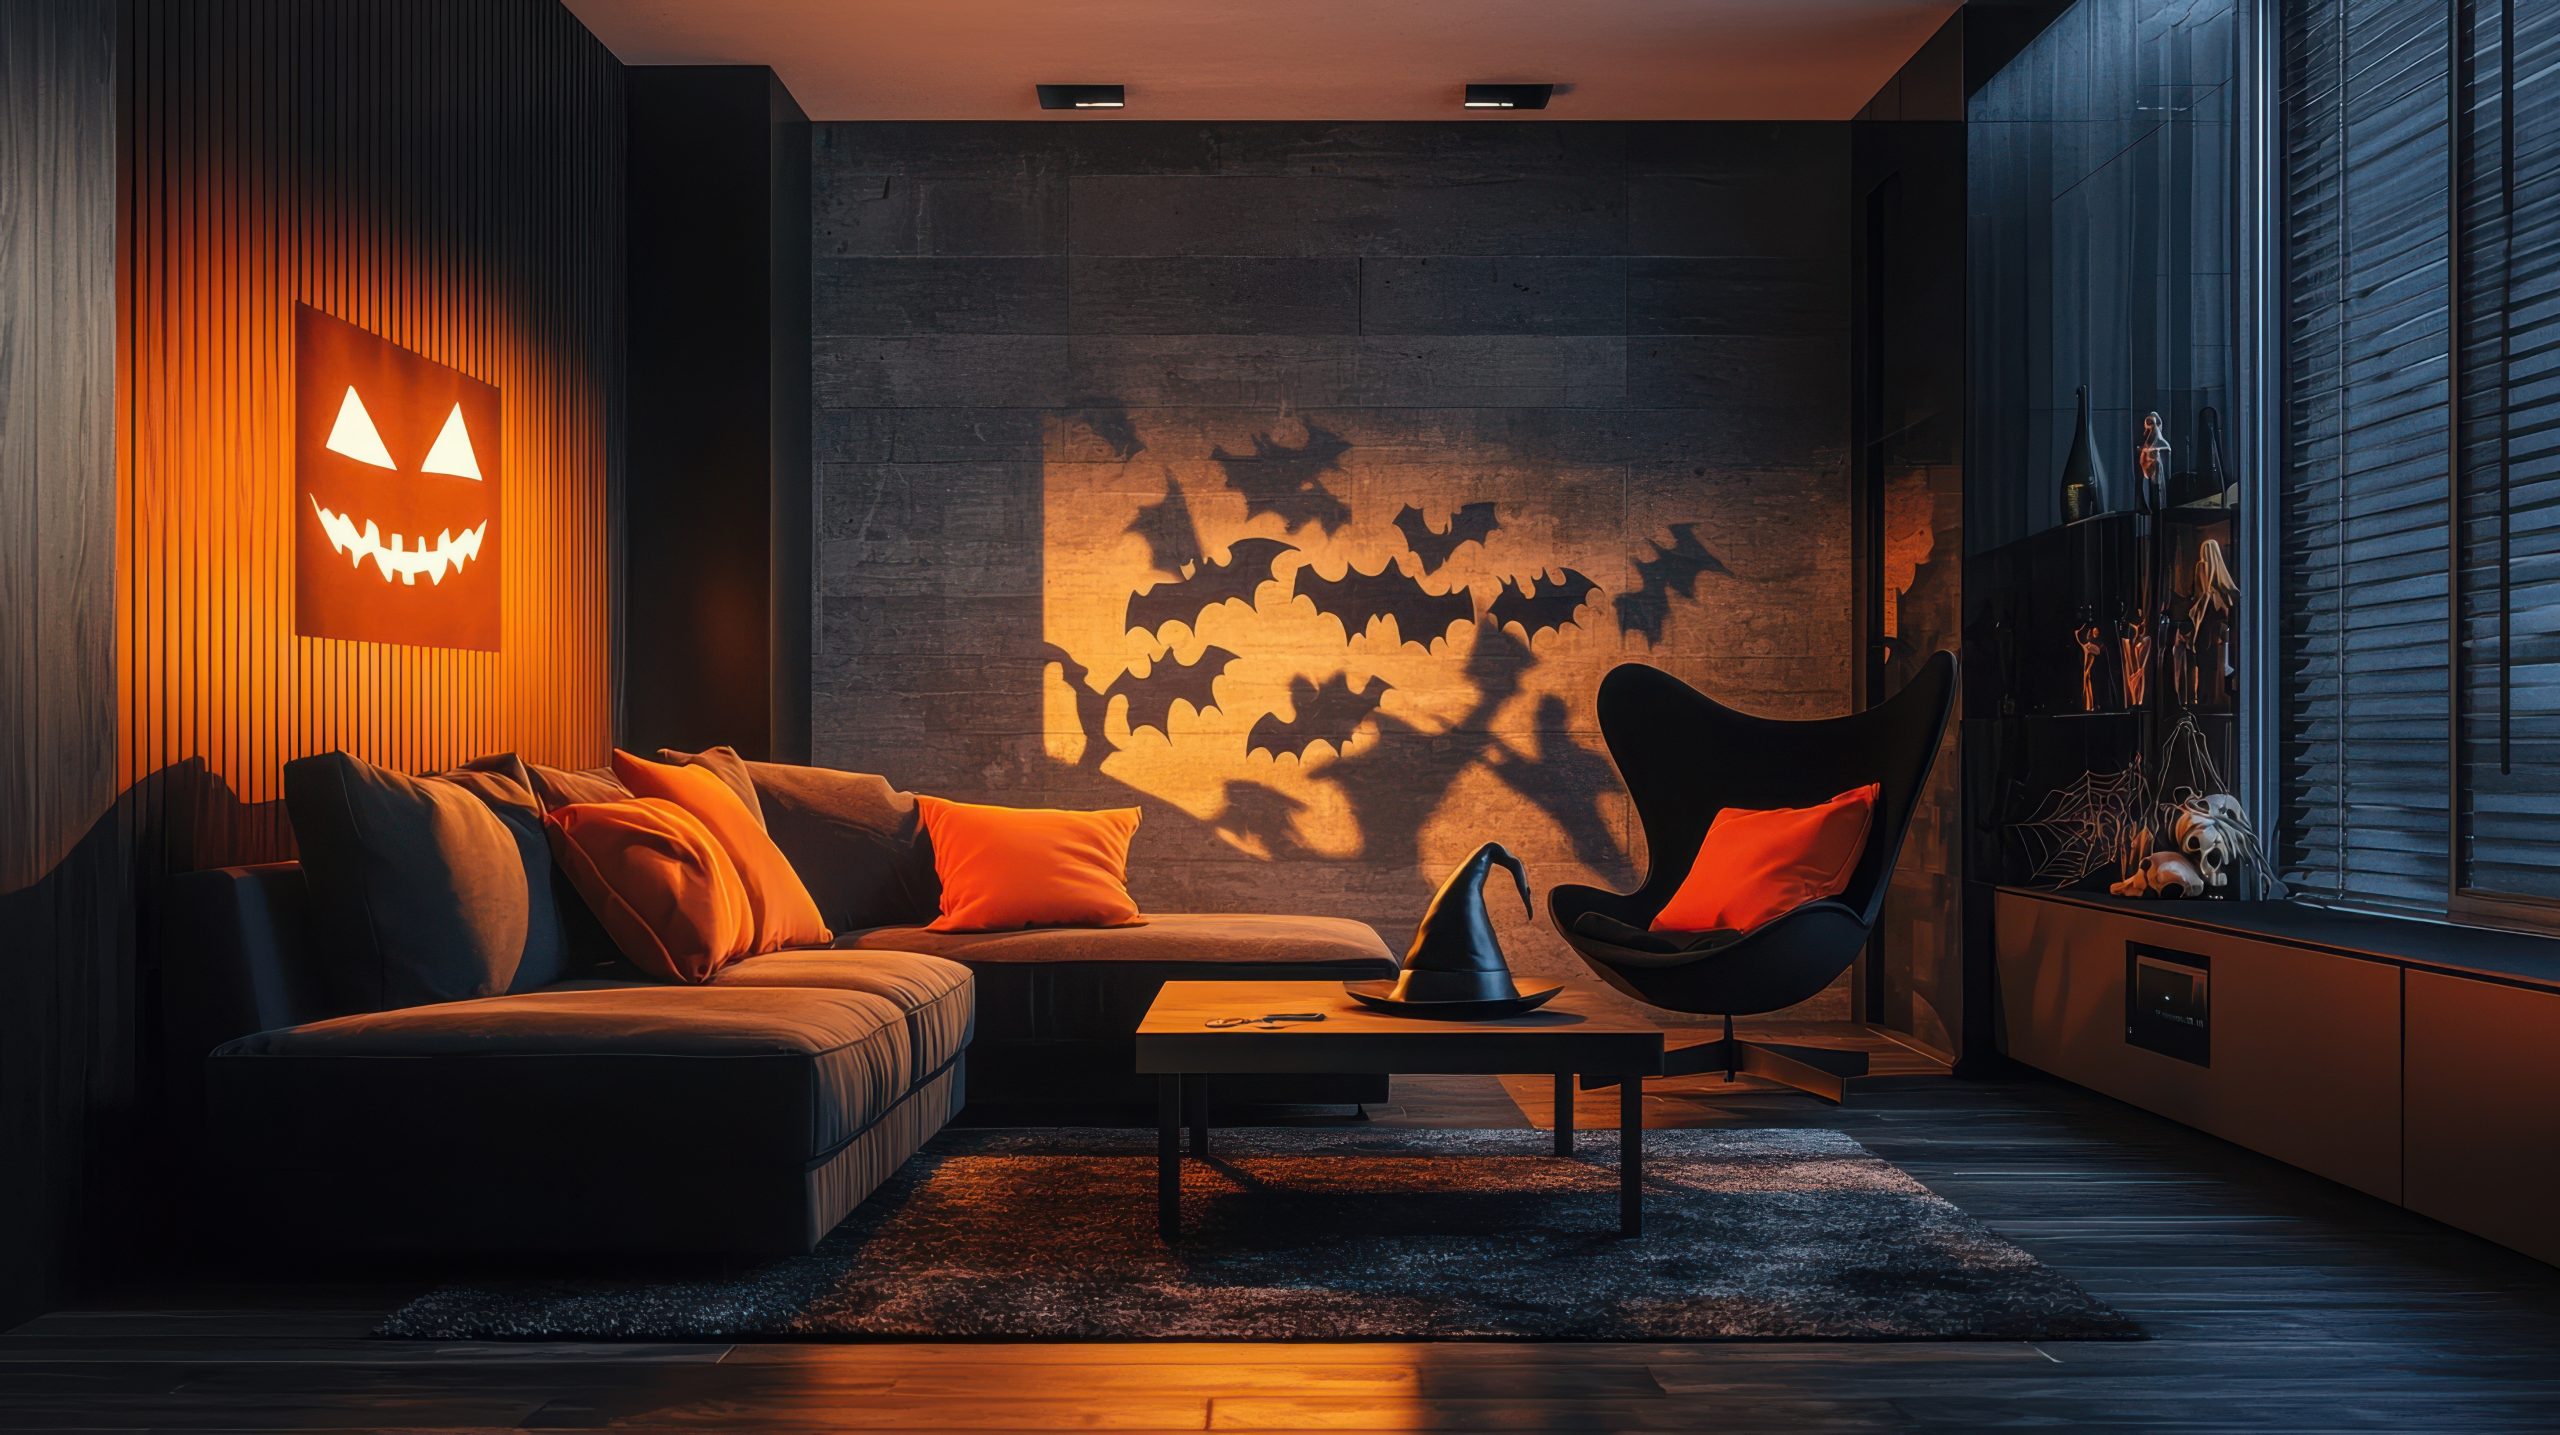
Next, add task lighting with a spooky twist. Replace lampshades with darker options or simply drape existing shades with sheer black fabric (keeping safety in mind with heat considerations). Position lamps to cast interesting shadows—place a decorative branch in front of a lamp to create eerie shadows on the wall, or use cutout silhouettes for more defined shapes.
Accent lighting is where you can really have fun. LED candles have come incredibly far in recent years; the best ones have a realistic flicker and can be placed anywhere without fire concerns. Group them in odd numbers on mantels, nestle them among your Halloween indoor decorations on shelves, or line them along windowsills for that haunted house glow visible from the street.
Don’t underestimate the power of removing light either. Strategic darkness creates mystery. Consider which areas of your rooms could benefit from deeper shadows. Sometimes what you don’t illuminate is just as important as what you do.
The foundation you create with colour and lighting determines how all your other Halloween indoor decorations will read in the space. Get these elements right, and even simple additions like a few well-placed ravens or vintage books will feel intentional and impactful. This approach ensures your Halloween design feels like a natural extension of your home’s personality rather than a temporary costume it’s wearing for the month.
Room-by-Room Halloween Indoor Decorations Guide
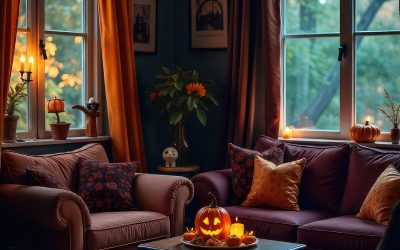
Living Room: The Heart of Your Haunted Home
The living room typically sees the most traffic and offers the most opportunities for impactful Halloween transformations. Since this is where you’ll likely spend most of your time—and where guests naturally gather—it deserves thoughtful attention.
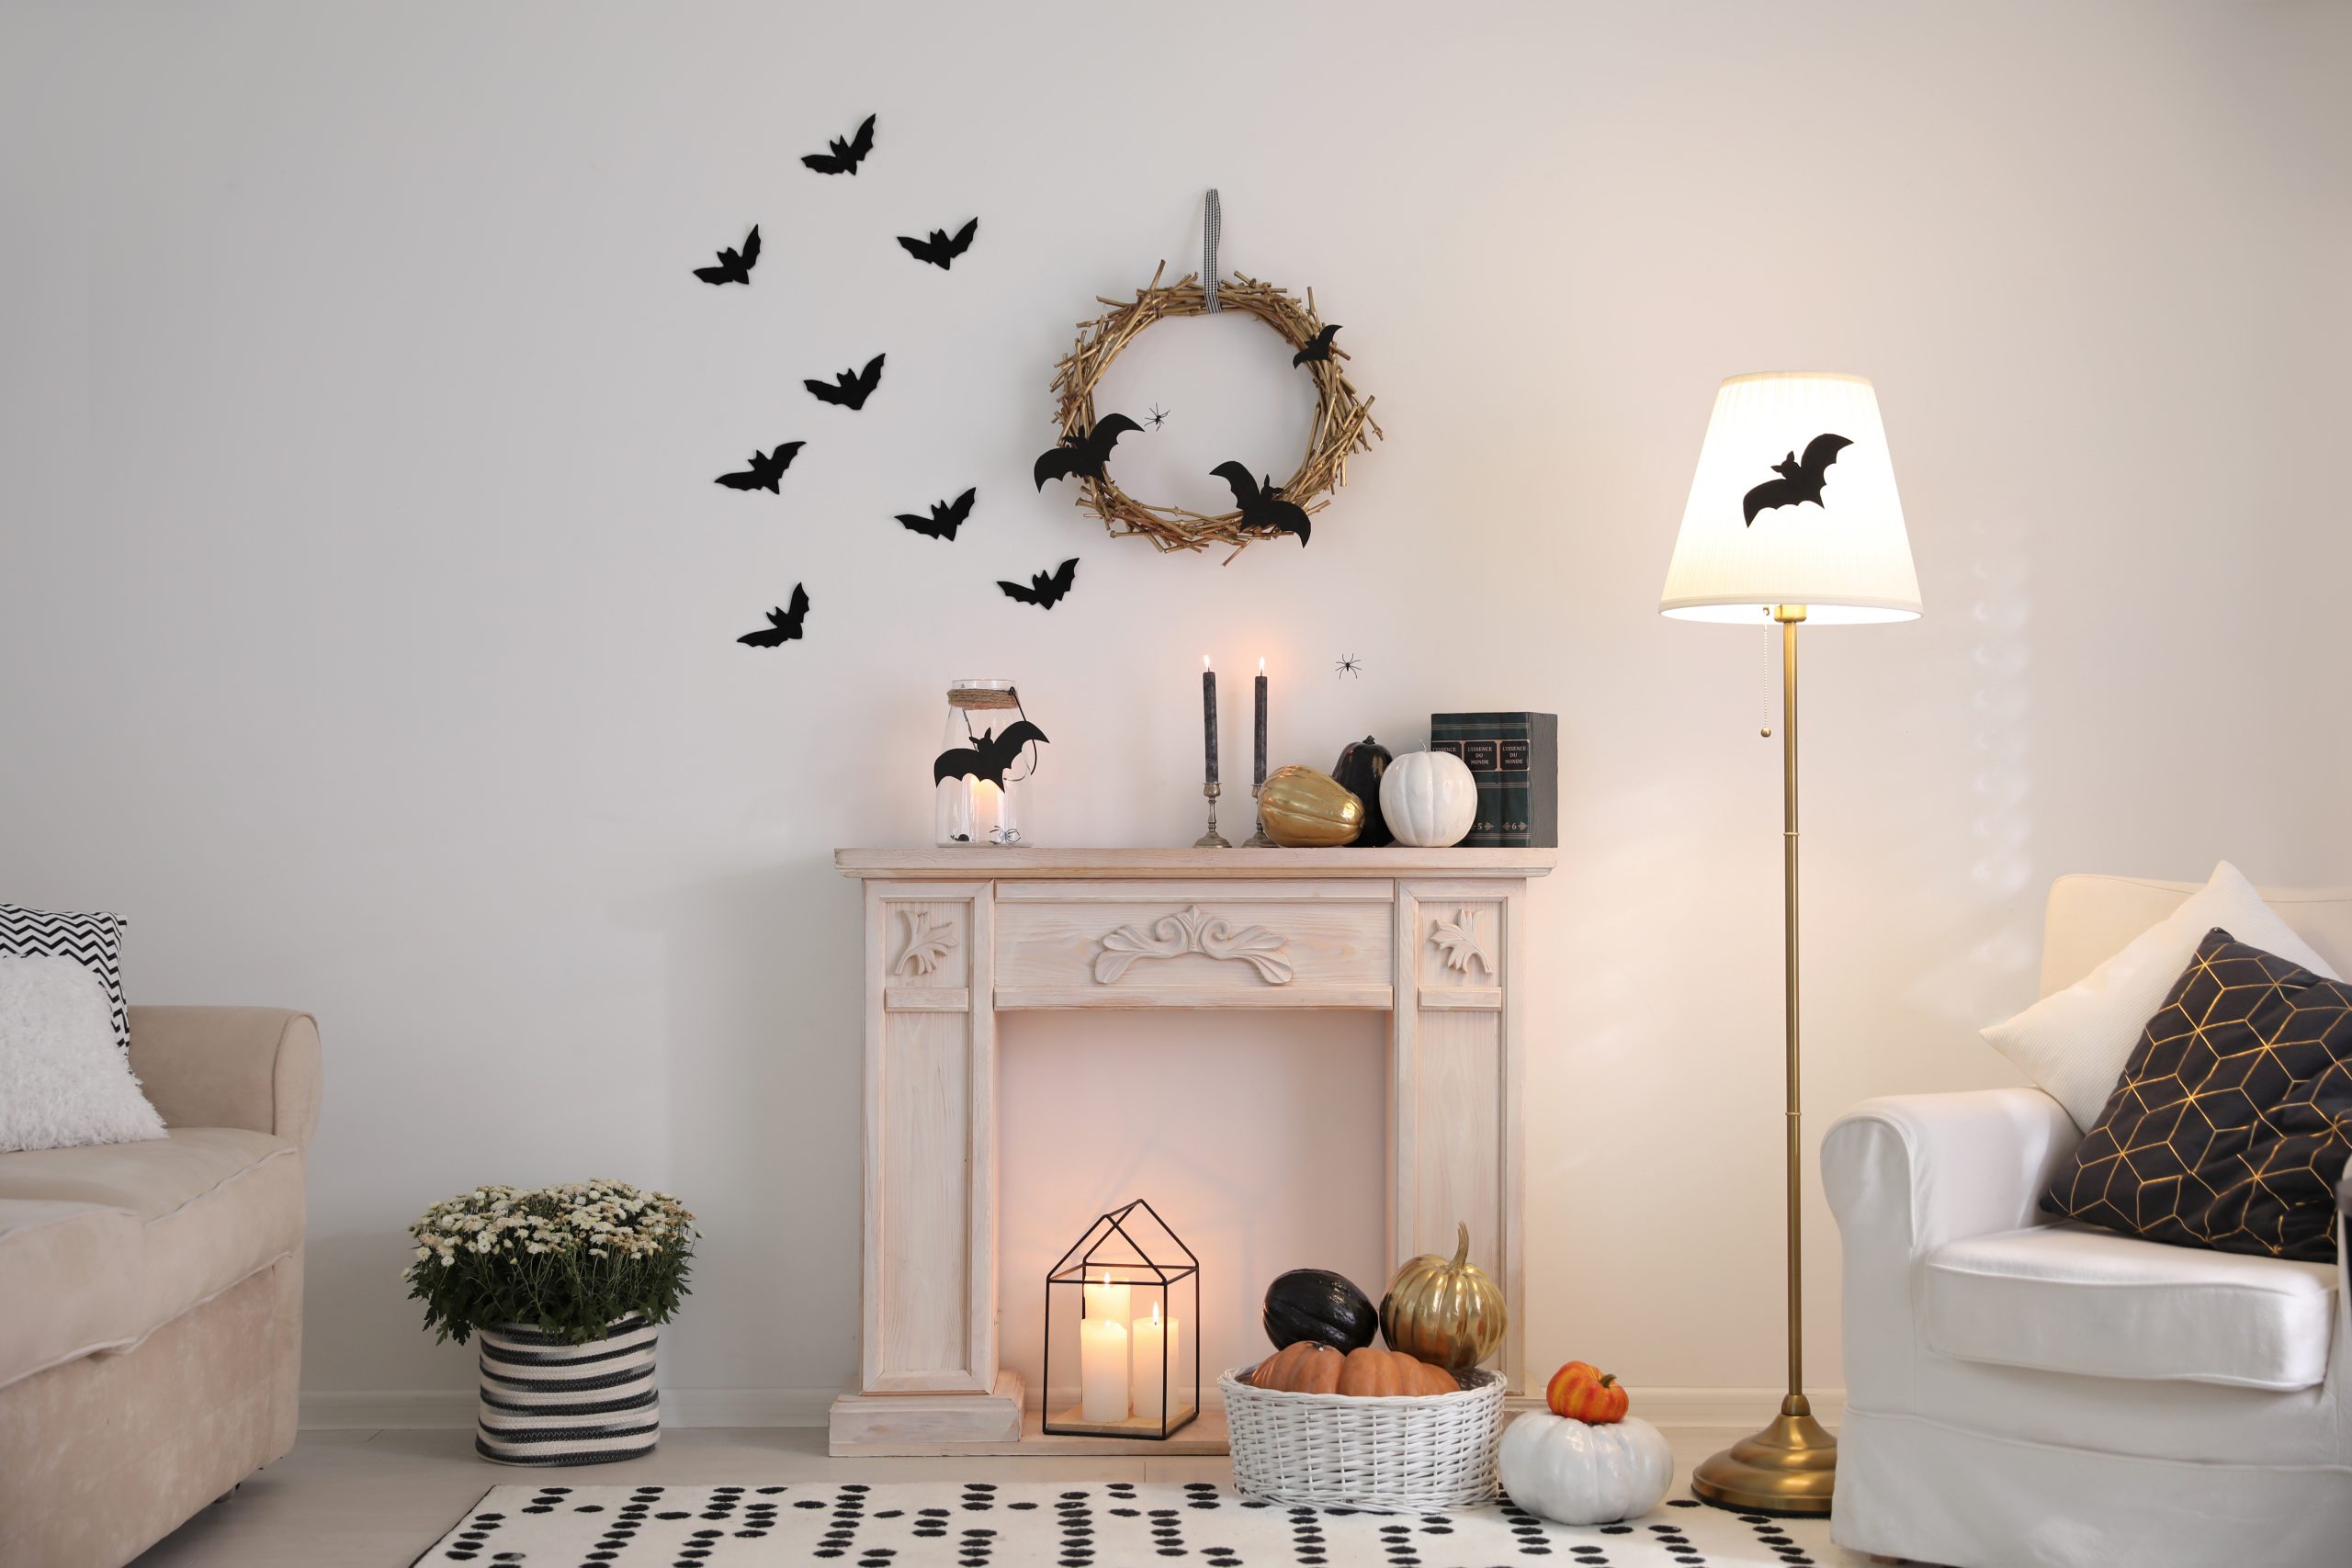
Start with your fireplace mantel if you have one. This natural focal point begs for dramatic styling. Layer varying heights using candlesticks, small decorative pumpkins in unexpected colours, and maybe a vintage mirror with artificially aged glass. The key is creating depth rather than a flat line of decorations. I like to incorporate natural elements like twisted branches or dried hydrangeas spray-painted black to add organic texture among the Halloween indoor decorations.
Your existing throw pillows offer an easy transformation opportunity. Rather than storing them away, consider pillow covers in rich velvets or subtle Halloween patterns—think damask with hidden skulls or abstract spider web designs. This approach keeps the room functional while adding seasonal flair. Mix these with your regular pillows rather than replacing everything for a more sophisticated, layered look.
Coffee table styling during Halloween should balance drama with practicality. A low tray containing a cluster of mercury glass votives, a few decorative skulls, and perhaps an antique book or two creates an intriguing vignette without interfering with the table’s functionality. Remember, people still need to set down drinks and snacks.
For wall art, temporary solutions work beautifully. Swap out a few family photos for vintage botanical prints of poisonous plants, or create your own “ancestor portraits” using thrift store frames and free vintage photographs available online. These Halloween indoor decorations can be changed yearly without damaging walls or requiring major commitments.
Dining Room: Setting a Sinister Table
The dining room presents unique opportunities because it’s often more formal to begin with, making Gothic transformations feel particularly natural. Even if you only use this space occasionally, dressing it for Halloween creates a dramatic impression when guests pass by.
Centrepiece design requires careful balance. You want something striking that doesn’t obstruct conversation across the table. Low, sprawling arrangements work well—think a runner of dark foliage punctuated with white mini pumpkins and deep purple flowers. Add height with taper candles in varying levels rather than one tall central arrangement.
Chair transformations don’t require slipcovers. Simple ribbon tied around chair backs, or small wreaths hung from dining chairs, can change the entire room’s feel. For a more dramatic effect, drape lengths of black tulle or lace from the backs of chairs, pooling slightly on the floor.
Your chandelier or dining room light fixture is prime real estate for Halloween indoor decorations. Lightweight additions like artificial spider webs (the good quality ones that actually look realistic), hanging bats, or crystal droplets can transform the fixture without risking damage. Just ensure any additions don’t interfere with the actual light output—you still want to see what you’re eating.
Don’t forget the walls. Removable wall decals have become incredibly sophisticated. Look for designs that complement your existing decor—perhaps Victorian-inspired patterns or subtle Gothic motifs rather than cartoon ghosts.
Entryway: First Impressions Matter
Your entryway sets the tone for everything that follows, making it crucial for Halloween decorating. This space should hint at the transformations within without overwhelming visitors the moment they step inside.
Console table styling in the entryway follows similar principles to coffee table arrangements, but can be more dramatic since it’s against a wall. Create height with tall branches in a statement vase, then layer in medium and low elements. A collection of mercury glass pumpkins, antique keys displayed in a shadow box, or аpоthecary-style bottles filled with mysterious contents all work beautifully as Halloween indoor decorations here.
Mirrors in the entryway offer fantastic decoration opportunities. Rather than removing them, consider adding removable vinyl decals that make it appear cracked or haunted. Window clings designed for mirrors can create the illusion of ghostly figures or messages appearing in the reflection. These temporary additions pack a serious visual punch without permanent alterations.
If you have stairs visible from the entry, they’re begging for decoration. Garland specifically designed for Halloween has improved dramatically—look for options that incorporate sophisticated elements like black roses, silver leaves, or deep purple berries rather than cartoon characters. Weave battery-operated lights through the garland for evening impact.
The coat closet often gets overlooked, but it offers a fun surprise element. Even just hanging a few decorative bats from the closet rod or adding a motion-activated sound element creates an unexpected moment of Halloween fun when guests hang their coats.
Kitchen: Subtle Spookiness
The kitchen presents unique challenges for Halloween indoor decorations since functionality must remain the priority. However, small touches can transform the space without interfering with meal preparation.
Counter styling should focus on corners and areas that don’t see heavy use. A small collection of decorative bottles labelled as “potions,” a cake stand displaying mini pumpkins, or a vintage scale holding gourds adds personality without cluttering work surfaces. Stick to items that can be easily moved when you need the space.
Window treatments offer temporary transformation opportunities. Gel clings designed for glass come in sophisticated patterns now—think spider webs, flying ravens, or Gothic architectural details. These Halloween indoor decorations catch light beautifully during the day and create interesting shadows at night.
Don’t overlook your appliances. Magnetic decorations can temporarily transform your refrigerator, while removable vinyl can add details to your dishwasher or range hood. Just ensure any decorations near the stove are heat-safe and positioned away from burners.
Even functional items can participate in the Halloween spirit. Swap out regular dish towels for ones in deep oranges or blacks. Display a festive cookie jar. Use Halloween-themed magnets to hold important papers on the fridge. These small touches collectively create an atmosphere without major investment or disruption to your daily routine.
DIY Projects for Custom Halloween Indoor Decorations
Professional-Quality Projects on a Budget
Creating custom pieces allows you to achieve exactly the look you’re after while keeping costs reasonable. These projects might take a bit more time, but the results rival anything you’d find in high-end decor stores.
The floating candle ceiling installation has become somewhat of a Halloween classic, but executing it well makes all the difference. Start with battery-operated taper candles—invest in ones with realistic wax dripping rather than plain plastic. Attach fishing line to each candle using hot glue, varying the lengths for visual interest. The magic happens in the installation: cluster them over dining tables or in corners rather than spreading them evenly across the ceiling. This creates more dramatic focal points and prevents the room from feeling like a party supply store.
Creating a gallery wall of vintage “family portraits” adds instant Gothic atmosphere. Source old frames from thrift stores—mismatched sizes and styles actually enhance the effect. For the portraits themselves, free vintage photographs are readily available online through library archives. Print them in sepia or black and white, then age the paper with tea staining. The unsettling factor comes from subtle modifications: use photo editing to slightly blur faces or add barely perceptible ghostly figures in the background. These Halloween indoor decorations work because they feel authentic rather than manufactured.
Apothecary displays tap into that Victorian Gothic aesthetic beautifully. Collect various glass containers—mason jars, old spice bottles, vintage medicine bottles from antique stores. Create labels using aged paper and calligraphy fonts: “Nightshade Extract,” “Powdered Moonstone,” “Essence of Shadow.” Fill containers with readily available materials: black beans become “dried beetles,” cauliflower florets in tinted water look remarkably like preserved specimens, and rubber snakes coiled in glycerin create convincing preserved serpents.
For book lovers, creating aged spell books and grimoires transforms any bookshelf. Use old hardcover books from thrift stores as your base. Cover existing spines with kraft paper, then apply new titles using transfer letters or printed labels. Age the covers with watered-down acrylic paint in browns and blacks, focusing on edges and corners where wear naturally occurs. Group these among your regular books for a subtly spooky library effect.
Quick Transformations (Under 30 Minutes)
Sometimes you need impact without the time investment. These faster projects still deliver sophisticated results worthy of any designer space.
Instant curtain upgrades using cheesecloth create ethereal, haunted effects. Simply drape lengths of cheesecloth over existing curtain rods, allowing it to puddle on the floor. The material’s loose weave creates beautiful shadow patterns when backlit. For added effect, tea-stain the cheesecloth beforehand or add strategic tears. This works particularly well in rooms where you want to maintain natural light while adding Halloween atmosphere.
Mirror aging techniques can transform any reflective surface into something from a haunted mansion. The easiest method uses a solution of vinegar and water sprayed onto the back of removable mirror film, which you then apply to existing mirrors. The chemical reaction creates authentic-looking age spots and clouding. When Halloween ends, simply peel off the film to restore your mirrors to pristine condition.
Lampshade modifications offer immediate ambience changes. Rather than replacing shades entirely, consider silhouette attachments. Cut shapes from black cardstock—ravens, bare trees, Victorian houses—and attach them to the inside of lampshades with removable adhesive. When lit, these Halloween indoor decorations cast dramatic shadows throughout the room. The beauty lies in their subtlety during daylight hours and their transformation after dark.
Picture frame haunting effects require minimal materials but maximum impact. Take existing framed photos and add subtle creepy elements: a ghostly figure in the background created with tissue paper and matte medium, eyes that seem to follow viewers using the old portrait trick, or gradually shifting family photos where someone slowly disappears across multiple frames. These work best when discovered rather than announced.
Incorporating Technology into Your Haunted Design
Smart Home Integration
Modern technology opens up possibilities for Halloween indoor decorations that would have seemed like magic just a few years ago. The key is using tech to enhance the atmosphere without making it the focus.
Voice-activated effects through smart home assistants can create surprising moments. Program custom routines triggered by specific phrases: saying “welcome home” after sunset might dim lights to red, start spooky ambient sounds, and activate specific Halloween decorations. Motion sensors placed strategically can trigger lights, sounds, or even fog machines as guests move through spaces.
Projection mapping, while sounding complex, has become surprisingly accessible. Small projectors can cast moving shadows, ghostly figures, or swirling fog effects onto walls without any permanent installation. The trick is subtlety—a barely visible ghost that occasionally drifts across a wall is far more effective than constant, obvious projections. Position projectors behind furniture or inside decorative elements to hide the source.
Sound design often gets overlooked, but it contributes so much to the atmosphere. Hide small Bluetooth speakers throughout your space—behind books, inside decorative containers, under furniture. Create layered soundscapes rather than obvious Halloween sounds: old house creaking, distant wind, occasional whispers. The goal is atmospheric enhancement that guests might not consciously notice but definitely feel.
Apps and Digital Elements
Digital picture frames offer endless possibilities for Halloween indoor decorations. Load them with slowly morphing portraits where faces subtly change over time, or create the illusion of movement in otherwise still images. The best effects are those that might go unnoticed at first glance—a figure that appears in a window only occasionally, eyes that sometimes follow movement.
Smart TVs can become part of your decor through carefully chosen screensavers. Rather than typical Halloween imagery, consider displaying Victorian mourning photography, slowly shifting abstract patterns, or high-quality video loops of flickering candles or moonlit windows. When the TV isn’t in active use, it becomes another decorative element rather than a black rectangle on the wall.
Coordinating all these elements requires planning, but creates an incredible impact. Use smart home routines to orchestrate lighting changes, sound effects, and visual elements. Imagine guests entering your home as lights automatically dim, subtle sound effects begin, and digital frames start their ghostly transformations—all triggered by the simple act of opening the front door.
Storage and Transition Planning
Designing with November 1st in Mind
One aspect of Halloween decorating that separates professionals from enthusiasts is thinking beyond October 31st. The best Halloween indoor decorations are those that either transition seamlessly into general fall decor or pack away efficiently for next year’s use.
When selecting pieces, consider their versatility. Deep purple throw pillows work through Thanksgiving. Metallic pumpkins in copper and gold tones feel appropriate until December. Black candlesticks and dark floral arrangements maintain their elegance year-round. This approach means you’re not frantically removing every trace of Halloween on November 1st—instead, you’re simply editing your collection.
Modular decoration systems make transitions smoother. Rather than creating elaborate displays that must be completely dismantled, design vignettes where specifically Halloween elements can be swapped out while the foundation remains. That console table arrangement might keep its branches and candlesticks but trade skulls for pinecones and bats for metallic leaves.
Creating an inventory system sounds tedious, but it saves so much time and money long-term. Photograph your Halloween indoor decorations in place before taking them down. Note what worked, what didn’t, and what you wished you had. Store items in clear containers labelled not just with contents but with room destinations. Next year, you’ll thank yourself for the organisation.
Year-Round Gothic Elements
Investing in quality pieces that transcend seasons makes financial and design sense. A beautifully crafted iron candelabra works for Halloween but also adds drama to winter dinner parties. Antique mirrors, vintage books, and architectural salvage pieces contribute to the Halloween atmosphere while remaining sophisticated year-round fixtures.
Building a curated collection over time prevents the common mistake of buying everything at once. Each year, invest in one or two significant pieces that genuinely enhance your space. This October, it might be a statement mirror with an ornate frame. Next year, perhaps a set of vintage apothecary jars. This approach ensures your Halloween indoor decorations feel collected rather than purchased in bulk.
Professional Tips for Cohesive Halloween Indoor Decorations
The Rule of Three
This fundamental design principle becomes even more crucial when decorating for Halloween. Our brains find odd numbers more visually appealing and dynamic than even groupings. Apply this to every surface: three pillar candles of varying heights, three framed prints on a wall, three decorative pumpkins clustered together.
Height variation within these groupings creates visual interest. If you’re arranging Halloween indoor decorations on a mantel, include something tall (branches or candlesticks), something medium (small pumpkins or decorative boxes), and something low (scattered autumn leaves or a horizontal decorative piece). This creates a rhythm that guides the eye naturally across the display.
Repeating elements throughout your space creates cohesion. If you use mercury glass pumpkins in the living room, include a few in the dining room and entryway. This repetition ties rooms together and makes your Halloween decorating feel intentional rather than random. The key is varying the application—grouped on a coffee table in one room, scattered along a mantel in another.
Avoiding Common Mistakes
Over-decorating small spaces ranks as the top mistake I see every Halloween. In compact rooms, one or two impactful pieces create more atmosphere than dozens of small decorations. A single dramatic piece—perhaps an oversized vintage mirror or a striking candelabra—makes a stronger statement than cluttering every surface.
Ignoring traffic flow becomes particularly problematic during parties. Those trailing cobwebs might look fantastic, but not if guests constantly walk through them. Floor-based decorations should sit against walls or in corners. Hanging elements need enough clearance for tall guests. Test your Halloween indoor decorations by walking normal paths through your home—if you’re ducking or sidestepping, reconsider the placement.
Quality matters more than quantity, especially with items you’ll use annually. That bargain-bin skeleton might seem like a deal, but cheap materials show immediately and deteriorate quickly. Instead, invest in fewer, better-made pieces. Well-crafted Halloween indoor decorations actually save money long-term since they won’t need yearly replacement.
Creating Focal Points
Every room needs a clear star of the show. In the living room, it might be your decorated mantel. The dining room could feature a dramatic tablescape. Entryways often showcase a styled console or striking wall display. Once you’ve identified each room’s focal point, ensure other decorations support rather than compete with it.
Drawing the eye strategically involves understanding natural sight lines. When someone enters a room, where does their gaze naturally fall? That’s where your primary Halloween display belongs. Secondary decorations should create a visual path that leads back to this main feature.
Balancing decorated and negative space prevents overwhelming visitors. For every heavily decorated area, provide visual breathing room nearby. If your mantel features elaborate Halloween styling, keep nearby surfaces relatively simple. This push and pull creates sophisticated tension that feels intentional and designed.
Creating a genuinely haunted home atmosphere doesn’t require abandoning your design principles or overwhelming your space with store-bought decorations. The most memorable Halloween indoor decorations are those that enhance your existing style while adding seasonal drama and mystery.